Showing posts with label Gift Card Holders. Show all posts

Saturday, December 15, 2018

Instructions - Punch Board Gift Card Holder

Her is yet another cute Gift Card Holder made from a 5 x 5 inch of cardstock, super easy & you can decorate the front many different ways!

~Enjoy


Start with a piece of cardstock (plain or printed - but it must be cardstock weight). Using your envelope punch board punch and score at 3", turn paper clockwise, then punch and score at 2", repeat.


Turn your envelope punch board around & use the corner rounder provided & round all corners of your envelope.


Stamp your solid cardstock


Cut a white piece of cardstock for the message box at 2 x 3.5 inches. Decorate the inside of the envelope as desired. Fold the envelope closed.


Using Swirly Snowflakes Thinlits Dies cut 2 white swirls from White Glimmer Paper and one Snowflake from Silver Glimmer Paper. Cut a belly band from a piece of coordinating paper to match your background. The one shown is only decorated with the small star cluster from Still Night. Punch a navy piece of cardstock with the Everyday Label punch.


Fold the band around the folded envelope. Secure the band with a small piece of Tear-n-tape. Make sure to use a sturdy adhesive because this will be an active piece of the card. Only use adhesive on the part where the band touches itself - do not adhere it to the envelope. This is meant to be able to slide on and off.

Add the punched label to the belly ban making sure to only adhere the 2 items together & do not add adhesive where it will touch the envelope. Add the Glimmer paper accents & some rhinestones for extra bling!


Here are some other designs!


Shop Stampin' Up! products here!

Decorative Envelope Gift Card Holders #2

Need a last minute gift? My family ONLY wants gift cards - so I can tackle 2 problems with one solution - easy gift card holders from Envelopes! See the full set of instructions here!

Here are some ideas for adding the finishing touches - so easy to do - I made all 6 of these in an hour!

~Enjoy


Talk about simple stamping!!! Just a quick stamp with the Spirited Snowmen set, a little coloring of the heart & the rhinestone with the Real Red Blends marker & a Christmas sentiment from Hung With Care stamp set. Finish it off with some Snowflakes from Still night & you have one easy gift card holder!


The Winter Woods set instantly provides a Christmas Tree farm! Add some colored pearls with Blend markers for a little extra holiday spirit! Season of Joy is from Christmas Pines stamp set.


What a cute was to say Merry Christmas with this rustic tree forest on Crumb Cake. Add a few trees a cute rustic sentiment topped off with a darling candy cane striped bow! Add a few rhinestones for some Christmasy glitz!


Look how easy & quick this card is. A piece of green embossed with Swirls & Curls embossing folder, a strip of Designer Series Paper, "Rudolph: cut from the Detailed Deer die set and Silver Glimmer paper with a cute hand Blends colored rhinestone nose. Add some free from snow drifts and the Seasons Greetings from Wishing You Well.


This one is perfect for the coffee enthusiast in your life, a cup of Christmas Cheer and an elf!! Sentiment is retired Merry Cafe, Coffee cup is from Coffee Cups Framelits Dies and the paper is Festive Farmhouse Designer Series Paper & top it off with the cutest elf from the Santa's Workshop DSP or the Signs of Santa stamp set!


Sometime I do not have a printed paper - but they are so easy to make with a few stamps. This one uses the Snowflake Sentiments for the large 2 snowflakes & the small snowflake cluster from Still Night. Add a navy Everyday Label Punch layered with Glimmer white swirls and a Glimmer silver snowflake and top it off with a few rhinestones - how easy is that?!


Shop Stampin' Up! products here!

Thursday, March 31, 2016

Decorative Label - Envelope Gift Card Holders

Dark Pink Birthday Flowers

Dark Pink Birthday Flowers

Supplies

  • Decorative Label Punch by Stampin' Up!
  • Ranger & Stampin' Up! Inks
  • Sentiment Stamp by Stampin' Up!
  • Recollections Flowers
  • Dimensional Dots
  • Glitter Glue
  • Scrap Papers & Cardstock
  • Envelope

Purple Birthday Flowers

Purple Birthday Flowers

Supplies

  • Decorative Label Punch by Stampin' Up!
  • Ranger & Stampin' Up! Inks
  • Sentiment Stamp by Stampin' Up!
  • Recollections Flowers
  • Ribbon
  • Dimensional Dots
  • Glitter Glue
  • Scrap Papers & Cardstock
  • Envelope

Light Pink Birthday Flowers

Light Pink Birthday Flowers

Supplies

  • Decorative Label Punch by Stampin' Up!
  • Ranger & Stampin' Up! Inks
  • Sentiment Stamp by Stampin' Up!
  • Recollections Flowers
  • Dimensional Dots
  • Glitter Glue
  • Scrap Papers & Cardstock
  • Envelope

Wednesday, March 30, 2016

Your Big Day - Gift Card Holders

Your Big Day - Brown

Your Big Day - Browns

Supplies

  • Banner Dies by Stampin' Up!
  • Flower Stamps & Punches by Stampin' Up!
  • Circle Punch
  • Sentiment Stamp by Stampin' Up!
  • Cake Stamp by Stampin' Up!
  • Ranger & Stampin' Up! Inks
  • Ribbon & Fibers
  • Blender Pen
  • Rhinestones
  • Dimensional Dots
  • Scrap Papers & Cardstock

Your Big Day - Pink

Your Big Day - Pinks

Supplies

  • Banner Dies by Stampin' Up!
  • Flower Stamps & Punches by Stampin' Up!
  • Circle Punch
  • Sentiment Stamp by Stampin' Up!
  • Cake Stamp by Stampin' Up!
  • Ranger & Stampin' Up! Inks
  • Ribbon
  • Blender Pen
  • Rhinestones
  • Dimensional Dots
  • Scrap Papers & Cardstock

Tuesday, March 29, 2016

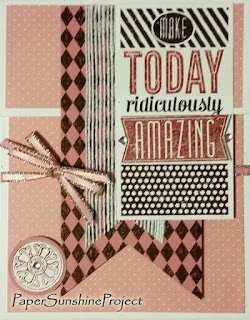
Totally Amazing - Gift Card Holders

Totally Amazing - Pink

Totally Amazing - Pink

Supplies

  • Banner Dies by Stampin' Up!
  • Circle Punch
  • Sentiment Stamp by Stampin' Up!
  • Icon Stamp
  • Ranger & Stampin' Up! Inks
  • Ribbons
  • Rhinestones
  • Dimensional Dots
  • Scrap Papers & Cardstock

Totally Amazing - Blue

Totally Amazing - Blues

Supplies

  • Banner Dies by Stampin' Up!
  • Banner Punch by Stampin' Up!
  • Sentiment Stamp by Stampin' Up!
  • Present Stamp
  • Ranger & Stampin' Up! Inks
  • Ribbon
  • Rhinestones
  • Dimensional Dots
  • Scrap Papers & Cardstock

Totally Amazing - Brown

Totally Amazing - Browns

Supplies

  • Banner Dies by Stampin' Up!
  • Circle Punch
  • Sentiment Stamp by Stampin' Up!
  • Dictionary Background Stamp by Stampin' Up!
  • Icon Stamp
  • Ranger & Stampin' Up! Inks
  • Ribbons & Fibers
  • Rhinestones
  • Dimensional Dots
  • Scrap Papers & Cardstock

Totally Amazing - Gold

Totally Amazing - Gold

Inspiration

This card was first presented to me by my good friend Shannon Cole ~ a Stampin' Up! Demonstrator. I love the idea so much - I decided to see what other cards I could make with the stamp set & ultimately the pop up card holder design. Check out what else Shannon has to offer at creatingforgrace.com

Supplies

  • All supplies for this card are from Stampin' Up!
  • Banner Dies
  • Circle & Decorative Icon Punch
  • Sentiment Stamp
  • Icon Stamp
  • Inks
  • Ribbon
  • Dimensional Dots
  • Papers & Cardstock

Birthday Balloons - Gift Card Holders

Green & Blue Stripes

Birthday Balloons - Blue & Green Stripes

Supplies

  • Yellow Banner & Balloon Dies by Stampin Up!
  • Ranger & Stampin' Up! Inks
  • White Banner Die
  • Dot Stamp by Stampin' Up!
  • Confetti Stamp
  • Sentiment Stamp
  • Ribbon
  • Dimensional Dots
  • Glitter Pen
  • Scrap Papers & Cardstock

Brown & Blue Plaid

Birthday Balloons - Blue & Brown Plaid

Supplies

  • Navy Banner & Balloon Dies by Stampin' Up!
  • Ranger & Stampin' Up! Inks
  • White Banner Die
  • Dot Stamp by Stampin' Up!
  • Confetti Stamp
  • Sentiment Stamp
  • Ribbon
  • Dimensional Dots
  • Glitter Pen
  • Scrap Papers & Cardstock

Green & Blue Flowers

Birthday Balloons - Blue & Green Flowers

Supplies

  • Blue Banner & Balloon Dies by Stampin' Up!
  • Ranger & Stampin' Up! Inks
  • White Banner Die
  • Dot Stamp by Stampin' Up!
  • Confetti Stamp
  • Sentiment Stamp
  • Ribbon
  • Dimensional Dots
  • Glitter Pen
  • Scrap Papers & Cardstock

Wednesday, March 23, 2016

Instructions - Top Fold Gift Card Holder


Card Base

  • Cut base cardstock 4-1/4 x 11 inches
  • Score at 2 and again at 7-1/2 inches
  • Fold


Accent Pieces

  • Cut accent paper - 2 pieces
  • One 4 x 4 inches
  • One 4 x 1-3/4 inches
  • TIP: Be careful to mark the pieces if it is a pattern you would like to keep matched ~ I mark "bottom" on the pieces


Accent Pieces

  • Adhere to cardstock
  • TIP: The top of the 4 x 4 will hang over ~ make sure to not add adhesive to the very top of the accent piece
  • TIP: If you are using a flimsier accent piece - you may want to double mat it on another piece of white or coordinating cardstock


Pocket

  • Cut the inside gift card pocket 3 x 5-3/4
  • Score at 1/2 and again at 4-1/4


Pocket

  • Fold in a zig zag pattern with the larger fold patterns together
  • Cut an additional piece of coordinating paper 3 x 1-1/2 inches


Pocket

  • Using 1/4 inch Scor-Tape (or some other very strong adhesive) tape the bottom (larger) right & left edges together to create a pocket
  • Add the accent piece you cut in the previous step
  • This will not show, but in case someone totally disassembles the card - it will look pretty
  • TIP: If you are using double sided paper - this will be created for you!


Pocket

  • On the small edge - run a piece of Scor-Tape along the crease
  • TIP: Larger tape is fine - just make sure you are next to the crease - not the outside edge


Assemble

  • Lay your pocket down centered (print up), Scor-Tape showing (do not bend it) and snug up against the crease of the top fold
  • Close the top flap
  • The top fold will lay exactly on the tape causing the little pocket to lift when opened


Assemble

  • Tuck the pocket inside the bottom flap


Assemble

  • Add ribbon to hold card closed
  • TIP: Ribbon is not meant to be removed, I usually add a small glue dot to the ribbon once my design is finalized


Create

  • Time to decorate!

Saturday, March 19, 2016

Instructions - Tri-Fold Gift Card Holder


Card Base

  • Cut base cardstock 4-1/2 x 11 inches
  • Notch out a piece 1-1/2 x 7 inches
  • Score from left as shown at 2-7/8 inches
  • Score again at 7 inches (lines up with the tab - bottom right)
  • Flip 90 degrees counterclockwise (your paper will now look like a "P")
  • Score at 3 inches


Belly Band

  • Cut an additional piece of coordinating cardstock 3/4 x 11 inches
  • NOTE: You could alternately cut one to go vertically across the card 3/4 x 8 inches - see examples near bottom


Accent Pieces

  • Example uses 3 patterns & until you get a feel for the flip flop nature of the card - you may want to use the 3 different patterns on the same side as you are building the card
  • Tip: You could use up to 5 patterns if desired
  • Tip: Consider what will be on the front in case you really want to use one of the papers as an accent there - you may not want to use it on the two pieces that will be underneath when the belly band is closed
  • Tip: Choose a light color for the inside middle section in case you want to write or add a stamped image - alternately, you could add an additional piece of white or beige cardstock on top of the print cut slightly smaller


Accent Pieces

  • Front left: 2-5/8 x 2-3/4 inches
  • Front right: 3-3/4 x 2-3/4 inches
  • Inside left: 2-5/8 x 2-3/4 inches
  • Inside middle: 3-7/8 x 2-3/4 inches
  • Inside right: 3-3/4 x 1-1/2 inches


Pocket

  • Fold up pocket, left side of pocket may need a trim to make it fit when folded inward
  • Add Scor-Tape to bottom right & left edges of pocket as shown in picture above
  • Fold up pocket again & secure


Assemble

  • Fold right side inward & adhere front right accent piece


Assemble

  • Fold left side inward & adhere front left accent piece


Belly Band

  • Use 3/4 x 11 inch piece of cardstock (from step above)
  • Score at 2-1/2 inches and again at 6-9/16 inches


Belly Band

  • Fold over card & make sure it is snug, but still moves easily
  • Adhere Scor-Tape to one edge & secure to other side of belly band


Create!

  • With the horizontal belly band (the 11 inch one)
  • Time to decorate!


Create!

  • With the vertical belly band (the 8 inch one)
  • Use 3/4 x 8 inch piece of cardstock (from step at top)
  • Score at 1-3/4 inches and again at 4-7/8 inches
  • Fold over card & make sure it is snug, but still moves easily
  • Adhere Scor-Tape to one edge & secure to other side of belly band
  • Time to decorate!


Example

  • Closed with belly band


Example

  • Closed without belly band


Example

  • Open without belly band