Totally Amazing - Pink
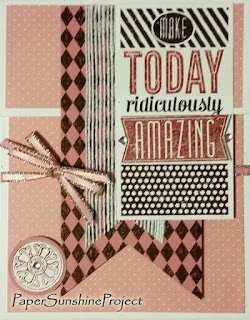
Supplies
- Banner Dies by Stampin' Up!
- Circle Punch
- Sentiment Stamp by Stampin' Up!
- Icon Stamp
- Ranger & Stampin' Up! Inks
- Ribbons
- Rhinestones
- Dimensional Dots
- Scrap Papers & Cardstock
Totally Amazing - Blue

Supplies
- Banner Dies by Stampin' Up!
- Banner Punch by Stampin' Up!
- Sentiment Stamp by Stampin' Up!
- Present Stamp
- Ranger & Stampin' Up! Inks
- Ribbon
- Rhinestones
- Dimensional Dots
- Scrap Papers & Cardstock
Totally Amazing - Brown

Supplies
- Banner Dies by Stampin' Up!
- Circle Punch
- Sentiment Stamp by Stampin' Up!
- Dictionary Background Stamp by Stampin' Up!
- Icon Stamp
- Ranger & Stampin' Up! Inks
- Ribbons & Fibers
- Rhinestones
- Dimensional Dots
- Scrap Papers & Cardstock
Totally Amazing - Gold

Inspiration
This card was first presented to me by my good friend Shannon Cole ~ a Stampin' Up! Demonstrator. I love the idea so much - I decided to see what other cards I could make with the stamp set & ultimately the pop up card holder design. Check out what else Shannon has to offer at creatingforgrace.com
Supplies
- All supplies for this card are from Stampin' Up!
- Banner Dies
- Circle & Decorative Icon Punch
- Sentiment Stamp
- Icon Stamp
- Inks
- Ribbon
- Dimensional Dots
- Papers & Cardstock


