Saturday, August 31, 2019

Gift of Fall meets Detailed Peacock

The August 2019 Paper Pumpkin Kit, The Gift of Fall offered many challenges due to the overwhelming color selection available, but the one that was the hardest for me was what to do with the add on kit Pretty Peacock wreath cards.

~Enjoy!


At first I cut them into scalloped circles and that was not sparking my creativity. Then I wondered what they would look like cut using the Delicate Lace Dies. Since the pattern of the leaves was really intricate and the dies was intricate, there was not enough of a pattern to have it not look like it had any direction. Then I thought of the Detailed Peacock Dies. I did not have great expectations for this one since the Delicate Lace Dies failed so dramatically and had 12 of them, so why not? But I was pleasantly surprised! Look how pretty this came out! The train is centered over the wreath and the crest just made it into the Crumb Cake border. Isn't he beautiful?


Now my sister had an absolute passion for all things peacock and I bought this die with her in mind, so I decided to make this guy into her birthday card since it is in December. Once again, I was struggling with what to do with him since he did not really look great on anything I tried except for white, which was a little too boring.

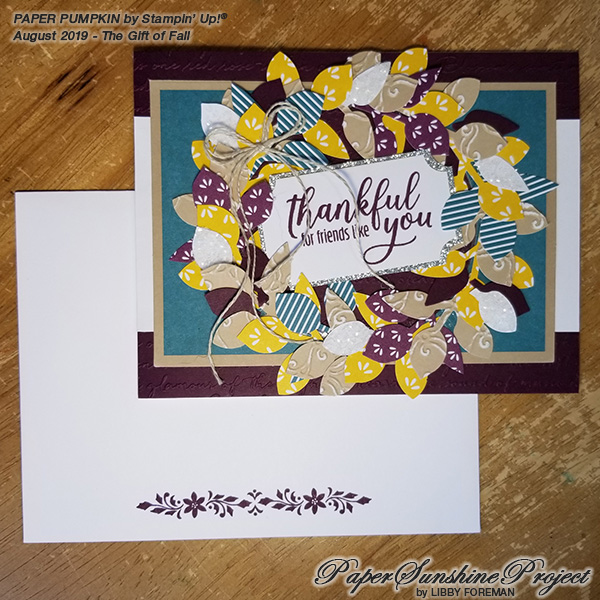
I started off with coloring some Silver Metallic Edge Ribbon. To color the ribbon, I took my Pretty Peacock Ink Refill and dropped a few drops onto a craft mat and added a few spritzes of water, then doused my ribbon into the mixture and set it aside to dry. Never wanting to be wasteful. I usually grab a piece of cardstock to sop up the leftovers. I happened to have a piece that was embossed with the Layered Leaves Embossing folder sitting on my desk, leftover from another project. So I dragged it through the ink from all directions and I love the results!!!

I added another piece of leftover Vellum embossed with Swirls and Curls to give it a little more interest and separation from the background. The sentiment is from Magnolia Blooms stamped in Pretty peacock with the reverse side of the tag that came in the Paper Pumpkin and backed with Silver Glimmer Paper. The whole thing is mounted on Pretty Peacock cardstock and the envelope was stamped with Beautiful Peacock from Sale-a-Bration a few years ago. I think my sister is going to LOVE it!


Stampin' Up! products used:
  • August 2019 Paper Pumpkin Kit, The Gift of Fall
  • The Gift of Fall Add-on
  • Detailed Peacock Dies
  • Magnolia Blooms Stamp Set
  • Pretty Peacock Ink Refill
  • Layered Leaves Embossing Folder
  • Swirls and Curls Embossing Folder
  • Silver Metallic Edge Ribbon
  • Whisper White
  • Pretty Peacock
  • Silver Glimmer Paper
  • Vellum
Shop Stampin' Up! products here!


Sunday, August 18, 2019

Watercolor Technique: Collection

Here are all of the cards together, even though they use different products, the overall effect is very similar!

~Enjoy!


Stampin' Up! products used:
  • Soft Spring Stamp Set
  • Country Home Stamp Set
  • Paper Pumpkin Stamp Set
  • Watercolor Pencils 
  • Watercolor Pencils Assortment 2
  • Aqua Painter
  • Stayz-On Black
  • Braided Linen Trim
  • Mini-Sequin Trim
  • Very Vanilla Scalloped Lace Trim
  • Whisper White Bakers Twine
  • Night of Navy Bakers Twine
  • Polka Dot Tulle Ribbon
  • 1/8" Pineapple Punch Grosgrain Ribbon
  • Linen Thread
Shop Stampin' Up! products here!


Watercolor Techniques: Pigment Sprinkles

This one is quick but has the opportunity to be very messy!

~Enjoy!


I sprinkled a few of the Granny Apple Green Pigment Sprinkles on a craft mat. Then I picked up the color with the Aqua Painter and did a quick color wash as a background onto a piece of Fluid 100 Watercolor Paper. It is really cool how different colors come out of the Pigment Sprinkles, I did not add any yellow to this, it came out of the sprinkles! I used my Heat Tool to speed up the drying process so I could stamp the plants with Soft Spring and StazOn Black Ink Pad. I filled in the plants with a mix of Garden Green and Granny Apple Green from the Watercolor Pencil Sets 1 & 2 and water-colored again with an Aqua Painter. I matted the watercolor paper on some Garden Green Card Stock and again on a Whisper White card base. The whole thing is topped off with a bow made from Linen Thread. The sentiment is stamped with one of the images in StazOn Black Ink and the Country Home Stamp Set.


Stampin' Up! products used:
  • Country Home Stamp Set
  • Soft Spring Stamp Set
  • Pigment Sprinkles 
  • Watercolor Pencil Sets
  • Watercolor Pencil Sets 2
  • Aqua Painter
  • Fluid 100 Watercolor Paper
  • Heat Tool
  • StazOn Black Ink Pad
  • Garden Green
  • Whisper White
  • Linen Thread
Shop Stampin' Up! products here!


Watercolor Techniques: Ink Pads

This is another really fast way to add some watercolor wash as a background!

~Enjoy!


For this one I used the Marina Mist Stamp Pad and I squeezed the lid onto the pad before opening it. Then I took an Aqua Painter and added just a little water to the inked lid & swished it back and forth across a piece of Fluid 100 Watercolor Paper intentionally leaving some swishes a little lighter & some a little darker. I added some White Bakers Twine twisted with Navy Bakers Twine and also added a bow with both colors. I mounted the whole thing on a card base of Marina Mist. I die cut some nautical elements from items in my stash. The anchor is cut with Night of Navy, the starfish is cut from Daffodil Delight and the sand dollar is cut from White Glimmer Paper. The banner is hand cut and stamped with Night of Navy & a sentiment from my stash.


Stampin' Up! products used:
  • Aqua Painter
  • Fluid 100 Watercolor Paper
  • White Bakers Twine
  • Navy Bakers Twine
  • Night of Navy
  • Daffodil Delight
  • White Glimmer Paper
  • Marina Mist
Shop Stampin' Up! products here!


Watercolor Techniques: Pencils

While I was preparing for a swap, I could not decide on what technique I wanted to bring, so I tried several techniques including one with Pigment Sprinkles to use as a water-coloring sample. These are all really quick & simple.

~Enjoy!


For this one I lightly scribbled Daffodil Delight from the Watercolor Pencils set onto a piece of  Fluid 100 Watercolor Paper, I also added a very light Granny Apple Green (from Watercolors Pencils 2 Set) to the mix as well as a little harder press from the Daffodil Delight to add some depth. Then I went over everything with an Aqua Painter to watercolor it & smooth out the strokes. I used my Heat Tool to speed up the drying process. I stamped the plants with Soft Spring and StazOn Black Ink Pad. I filled in the plants with a mix of Garden Green and Granny Apple Green and water-colored again with an Aqua Painter. I matted the watercolor paper on some Pineapple Punch Card Stock and again on a Whisper White card base. The whole thing is topped off with a bow made from the Polka Dot Tulle Ribbon and the 1/8" Pineapple Punch Grosgrain Ribbon. The sentiment is stamped with one of the images in StazOn Black Ink and the Country Home Stamp Set.


Stampin' Up! products used:
  • Country Home Stamp Set
  • Soft Spring Stamp Set
  • Fluid 100 Watercolor Paper
  • Watercolor Pencils
  • Watercolors Pencils 2
  • Heat Tool
  • Aqua Painter
  • StazOn Black Ink 
  • Polka Dot Tulle Ribbon
  • 1/8" Pineapple Punch Grosgrain Ribbon
  • Pineapple Punch
  • Whisper White
Shop Stampin' Up! products here!


Gift of Fall Paper Pumpkin Colorful Banner 2

Using my favorite element from the September 2019 Paper Pumpkin: Gift of Fall, the colorful leaves banner, did not result as pretty as I had hoped...

~Enjoy!


I started with the Mossy Meadow background and embossed it with the Layering Leaves Embossing Folder. I scruffed up the edges of the colorful leaves banner. I embossed the circle with the Scripty 3D Embossing Folder & then lightly sanded to have the white core show through. The additional little sprigs are cut from the retired Bird Builder Punch, which matched almost perfectly to the supplied sprigs. The sentiment is stamped with Merry Merlot and then the edges were sanded & then roughed up with a scissor edge to add a little texture. The Crushed Curry background is stamped with Crushed Curry and the line stamp from Tasteful Textures.


I colored the Ice Stampin' Glitter crystals with some Mossy Meadow Ink Refill and adhered then with Shimmery Crystal Effects. A few gold sequins add just a little sparkle! 


Stampin' Up! products used:
  • September 2019 Paper Pumpkin: Gift of Fall
  • Tasteful Textures Stamp Set
  • Layering Leaves Embossing Folder
  • Scripty 3D Embossing Folder
  • Bird Builder Punch
  • Ice Stampin' Glitter
  • Shimmery Crystal Effects
  • Mossy Meadow Ink Refill 
  • Mossy Meadow
  • Merry Merlot
  • Crushed Curry 
Shop Stampin' Up! products here!


Gift of Fall Paper Pumpkin Colored Ribbon

The ribbon that came with the September 2019 Paper Pumpkin: Gift of Fall is one of may favorite ribbon, seam binding, but man was that Crushed Curry color BRIGHT!!!

~Enjoy!


I initially started to find a way to just mellow the yellow down dsome and once I got started I was really happy with the variety of colors I ended up with. For the green ribbon I colored the yellow ribbon with the Old Olive Blends Marker and got kind of a Mossy Meadow. For the darker yellow one I colored it with Crumb Cake. The brownish reddish one was colored with Cherry Cobbler and the Orange one is colored with Pumpkin Pie. I always forget that any light colored ribbon can be colored with the Blends and happy to make this little discovery!  


Stampin' Up! products used:
  • September 2019 Paper Pumpkin: Gift of Fall
  • Old Olive Blends Marker
  • Crumb Cake Blends Marker
  • Cherry Cobbler Blends Marker
  • Pumpkin Pie Blends Marker
Shop Stampin' Up! products here!


Gift of Fall Paper Pumpkin White Core

I stole this idea for my friend Tracy over at Stuff-n-Thingz and I used it on almost every card I made for this set! It is called White Core.

~Enjoy!


This kit came with the card backs that were Crumb Cake, Watercolor Wash Sunset or Pretty Peacock on one side & Whisper White on the other, which means the color is layered over white causing the paper in general to have a white core. What is nice about white core cardstock, is when you emboss it, as I have done here & then take some kind of sanding block & gently rub over the raised area, the color falls away & you are left with the white peaking through, I love this technique! The Embossing folders used below are Scripty 3D, Layered Leaves and Stylish Scroll, I think the more intricate the embossing folder is the better the results.


Stampin' Up! products used:
  • September 2019 Paper Pumpkin: Gift of Fall
  • Scripty 3D Embossing Folder
  • Layered Leaves Embossing Folder
  • Stylish Scroll Embossing Folder
Shop Stampin' Up! products here!


Gift of Fall Paper Pumpkin Pretty Peacock

This card came to be after I trimmed the wreath from the Pretty Peacock card bases that came with the September 2019 Paper Pumpkin: Gift of Fall Add On.

~Enjoy!


I ran the remnants through my embossing machine with the Stylish Scroll Embossing Folder & then lightly sanded to have the white core show through. I trimmed the top & bottom of the card base down to match the width of the card & added the Crumb Cake top & bottom edges back to the Pretty Peacock. The whole thing was them matted on Very Vanilla. I used some of the Crumb Cake card bases and ran them through my embossing machine with the Stylish Scroll Embossing Folder and then sanded the tops of the paper lightly to release the white core. I then punched those & some additional Blackberry Bliss using the Leaf Punch. The sentiment was embossed with White Embossing Powder on Blackberry Bliss & layered on Crumb Cake. The whole thing it topped off with a bow made from the Very Vanilla Scalloped Lace Trim which gives the card a vintage feel. The envelope was stamped with Amazing Life.


Stampin' Up! products used:
  • September 2019 Paper Pumpkin: Gift of Fall
  • Amazing Life Stamp Set
  • Leaf Punch
  • Stylish Scroll Embossing Folder
  • Very Vanilla Scalloped Lace Trim 
  • Pretty Peacock
  • White Embossing Powder 
  • Very Vanilla
  • Blackberry Bliss
Shop Stampin' Up! products here!


Gift of Fall Paper Pumpkin Colorful Banner

This colorful leafy banner was my favorite element from the September 2019 Paper Pumpkin: Gift of Fall. 

~Enjoy!


After adhering the banner in a horizontal position on Whisper White cardstock, I cut out the shape with the Stitched Rectangles Dies. I scuffed up the sentiment block with my scissors and stamped the sentiment with Mossy Meadow.  I supplemented the leafy greenery with the Leaf Punch for the Crushed Curry leaf and the Bouquet Bunch Dies for the Mossy Meadow leaf. Topping it off is a double bow made from the Linen Thread. I adore the simplicity and beauty of this one! 


Stampin' Up! products used:
  • September 2019 Paper Pumpkin: Gift of Fall
  • Bouquet Bunch Dies
  • Stitched Rectangles Dies
  • Leaf Punch
  • Whisper White
  • Mossy Meadow
  • Crushed Curry 
  • Mossy Meadow
  • Linen Thread
Shop Stampin' Up! products here!


Gift of Fall Paper Pumpkin Sunset

This card uses one of my favorite elements from any Paper Pumpkin ever, the colorwash sunset from the September 2019 Paper Pumpkin: Gift of Fall Add On.

~Enjoy!


This card starts off with a piece of Merry Merlot background paper. Then I ran the card base provided with the Gift of Fall Add On through the embossing machine with the Scripty 3D Embossing Folder. I then lightly sanded the top of the sunset paper to expose the white core of the paper. I scruffed up the edges of the paper and added a few additional sprigs cut from Merry Merlot, Crushed Curry & the Leaf Punch. The sentiment is stamped with Merry Merlot and layered over Silver Glimmer Paper


The whole thing is then topped off with a double bow made from the Linen Thread. I also made a version of this using Pumpkin as a background and Gold Glimmer Paper under the sentiment. 


Stampin' Up! products used:
  • September 2019 Paper Pumpkin: Gift of Fall
  • Gift of Fall Add On 
  • Scripty 3D Embossing Folder
  • Leaf Punch
  • Silver Glimmer Paper
  • Merry Merlot
  • Crushed Curry
Shop Stampin' Up! products here!


Gift of Fall Paper Pumpkin Wreath

This was one of the first cards I tackled - what was I going to do with all of those little tiny leaves? I love how it came out but it was definitely a labor of love!

~Enjoy!


Let's start with the easy part, the background. I embossed a piece of Blackberry Bliss with the Scripty 3D Embossing Folder, layered with a piece of white & 2 trimmed down pieces of the Gift of Fall add on cards with the Pretty Peacock Wreath removed. The sentiment is stamped with Blackberry Bliss & layered over a piece of Silver Glimmer Paper. The whole thing is topped off with a double bow made with the Linen Thread. 


Now let's talk about those leaves! I trimmed assorted leaves with several papers and the Leaf Punch to match the Blackberry Bliss & Pretty Peacock leaves that came with the kit. The Crushed Curry ones came from the envelope flaps and then I supplemented some plain Blackberry Bliss ones from cardstock. With the Gift of Fall add on cards, I used some of the Crumb Cake card bases and ran them through my embossing machine with the Stylish Scroll Embossing Folder and then sanded the tops of the paper lightly to release the white core.  Lastly, I punched some leaves with Whisper White & added some Ice Stampin' Glitter crystals adhered with Shimmery Crystal Effects.


Stampin' Up! products used:
  • September 2019 Paper Pumpkin: Gift of Fall
  • Gift of Fall Add-on
  • Leaf Punch
  • Scripty 3D Embossing Folder
  • Stylish Scroll Embossing Folder
  • Silver Glimmer Paper
  • Linen Thread
  • Ice Stampin' Glitter
  • Shimmery Crystal Effects
  • Blackberry Bliss
  • Whisper White 
Shop Stampin' Up! products here!


Gift of Fall Paper Pumpkin on White

This card utilizes the yellow wreath elements from the September 2019 Paper Pumpkin: Gift of Fall. 
~Enjoy!


I trimmed a Whisper White background & then embossed it with the Layered Leaves Embossing Folder, I love the simplicity of the white on white background.  The wreath was cut with the Layering Circles Dies. I added a few of the vellum springs, the sentiment stamped in Soft Suede, a little Gold Glimmer Paper behind the sentiment and a bow made by coloring the ribbon with a Cherry Cobbler Blends Marker. Simply pretty! 


Stampin' Up! products used:
  • September 2019 Paper Pumpkin: Gift of Fall
  • Layering Circles Dies
  • Layered Leaves Embossing Folder
  • Cherry Cobbler Blends Marker
  • Gold Glimmer Paper
  • Soft Suede
  • Whisper White
Shop Stampin' Up! products here!


Gift of Fall Paper Pumpkin Banner

Here is another alternative for the September 2019 Paper Pumpkin: Gift of Fall using the envelope flaps as background paper.

~Enjoy!


I layered 3 envelope flaps on Whisper White & used that as the background for this card. I then layered that over a Garden Green strip and Whisper White card base. The banner is made from an envelope & embossed with the Subtle Embossing Folder. The circle was embossed with the Scripty 3D Embossing Folder & then lightly sanded to have the white core show through.  The additional little sprigs are cut from the Flourish Dies. The sentiment is stamped with Soft Suede and then roughed up with a scissor edge to add a little texture. 


The ribbon is colored with Crumb Cake Blends Marker which dulled the bright yellow ribbon down to a more suitable color and I added a little Gold Glimmer Paper and a few gold sequins to add a little bling.   


Stampin' Up! products used:
  • September 2019 Paper Pumpkin: Gift of Fall
  • Layering Circles Dies
  • Flourish Dies
  • Subtle Embossing Folder
  • Scripty 3D Embossing Folder
  • Crumb Cake Blends Marker 
  • Gold Glimmer Paper 
  • Whisper White
  • Garden Green
  • Soft Suede
  • Crushed Curry
  • Vellum
Shop Stampin' Up! products here!


Gift of Fall Paper Pumpkin Sprigs

This card uses up some of the vellum sprig elements from the September 2019 Paper Pumpkin: Gift of Fall.

~Enjoy!


This one turned out to be one of my favorite cards, using one of my favorite elements, the vellum sprigs! The sprigs are layered on Whisper White & cut with the Layering Square Dies. Those are then layered on Merry Merlot cut with the Delicate Lace Dies. The background uses a technique I stole from Tracy. This kit came with the card backs that were Crumb Cake on one side & Whisper White on the other, which means the crumb cake is layered over white causing the paper in general to have a white core. What is nice about white core cardstock, is when you emboss it, as I have done here with the Scripty 3D Embossing Folder & then take some kind of sanding block & gently rub over the raised area, the Crumb Cake falls away & you are left with the white peaking through, I love this technique! 


I added a bit of Gold Glimmer Paper for a little extra bling and the whole thing is topped with another favorite, a double bow made with Linen Thread. The envelopes are stamped with a retired sprig & berries set.  


Stampin' Up! products used:
  • September 2019 Paper Pumpkin: Gift of Fall
  • Layering Squares Dies
  • Delicate Lace Dies
  • Scripty 3D Embossing Folder
  • Gold Glimmer Paper 
  • Linen Thread
  • Whisper White
  • Merry Merlot 
  • Crumb Cake
Shop Stampin' Up! products here!


Gift of Fall Paper Pumpkin Coffee

The elements from the Gift of Fall for the September 2019 Paper Pumpkin are just gorgeous!  I did not make any of the little gift bags, instead I came up with several alternatives cards.

~Enjoy!


The first card uses the envelope flaps as the background background layered on Whisper White. The Merry Merlot border strip is a remnant leftover after I cut the zig zag pattern with the Delicate Lace Dies and then embossing with the Falling Leaves Embossing Folder (my favorite!)  The coffee cups were stamped with the retired Merry Cafe Stamp Set and Merry Merlot strategically on the envelope corners. The one on the left is actually 2 envelope corners & hidden by the coffee band embossed with the Corrugated Embossing Folder and Crumb Cake and the other with the Coffee Cup Framelits Dies. The sentiment stamps for this set are some of the most beautiful ones I have ever seen! The whole thing is topped off with a Linen Thread bow. The stamps on the envelopes are from a retired set.


The background for this card uses the sweater pattern from the October 2016 Paper Pumpkin Kit: Season of Gratitude layer over Cajun Craze & inked up with Early Espresso. The ribbon was from the kit & I colored it with a Cherry Cobbler Blends Marker, the yellow in the ribbon altered the color to a nice Cajun Craze! The Yellow background banner is from the April 2015 Paper Pumpkin: Love you a Lot.  


Stampin' Up! products used:
  • September 2019 Paper Pumpkin: Gift of Fall
  • October 2016 Paper Pumpkin Kit: Season of Gratitude
  • April 2015 Paper Pumpkin: Love you a Lot
  • Merry Cafe Stamp Set 
  • Coffee Cup Framelits Dies
  • Delicate Lace Dies
  • Falling Leaves Embossing Folder
  • Corrugated Embossing Folder
  • Cherry Cobbler Blends Marker
  • Whisper White
  • Merry Merlot 
  • Crumb Cake
  • Linen Thread
  • Cajun Craze
  • Early Espresso
Shop Stampin' Up! products here!


Pigment Sprinkles meets Soft Spring

Last card for the day. While the sprinkles were still out and the hands were already inky, I proposed one last project that was quick & simple.

~Enjoy!


We decided on the Soft Spring Stamp set. We both used (without talking to each other) the other person's Pigment Sprinkle colors, so I used the Granny Apple Green for mine. We pulled out watercolor paper, added some sprinkles to our craft mats, picked up the color with the Aqua Painter and did a quick color wash as a background. Stamp one of the images in Memento Black and add a sentiment from Country Home. Topping it off is a simple double bow made with Linen Thread. Don't forget to check out Tracy's card


Stampin' Up! products used:
  • Country Home Stamp Set
  • Soft Spring Stamp Set
  • Pigment Sprinkles
  • Fluid 100 Watercolor Paper
  • Aqua Painter
  • Linen Thread
  • Garden Green
  • Memento Black
Shop Stampin' Up! products here!


Seaside Notions meets Pigment Sprinkles

What fun day I had with Tracy today. We meet digitally since she is in Washington state (today) and I am in North Carolina!

~Enjoy!


The third project of the day was to replicate a Stampin' Up! Designer card with the new colors of Pigment Sprinkles! What a mess this card was and it took a couple of tries to get the background correct for the layout, but it is stunning in person! The item on the left was my first but was way too dark for the technique and gold embossing powder to show through. The 3rd sample is when I took the mess on my craft mat & dragged a 4.5 x 5.25 watercolor card front and sopped up the leftovers. Not sure what I will use it for yet & Tracy wants to use the one on the left as a storm cloud, so I will be sending it off to her to play with!


So with a lighter hand with the Melon Mambo sprinkles on a watercolor background and some a little water layer, this one turned out better! After I embossed the Gold Embossing Powder, I took some of the Gorgeous Grape sprinkles on my craft mat and just a little water & saturated the interior of the stamp with loads of color. Luckily the embossed image creates a well & held the color in place until it dried.


Although we both walked away with pink fingers for the next day, we loved the overall experience and will work again with the sprinkles! Don't forget to check out Tracy's card!


Stampin' Up! products used:
  • Seaside Notions Stamp Set
  • Pigment Sprinkles
  • Fluid 100 Watercolor Paper
  • Gold Glimmer Paper
  • Gold Embossing Powder
  • Whisper White
  • Basic Black
Shop Stampin' Up! products here!


Very Versailles in Black & Vanilla

Tracy & I had a surprise play date today, two in one moth was quite the surprise!

~Enjoy!


We have been dying to use the Very Versailles in an all Basic Black and Very Vanilla them like this one we found on Pinterest from Blue Rose Paper Treasures! I had just ordered the Delicate Lace Dies and did not have them to finish this card during our play date so I started it & finished it once I got the dies. I had to stamp off the Memento Black to get the softer grey for the background. I used some retired lace trim and the butterflies are a combination of retired Papillon Potpourri Stamp Set and Butterfly Beauties Die Set. Sentiment is from Beautiful Bouquet and cut with the Stitched Rectangle Dies.The tiny butterfly is from Beauty Abounds.


This one uses all the same items as above but uses the new Scalloped Lace Trim. But check out what tracy did for my Birthday card!


Stampin' Up! products used:
  • Very Versailles Stamp Set
  • Papillon Potpourri Stamp Set
  • Butterfly Beauties Die Set
  • Beautiful Bouquet Stamp Set
  • Beauty Abounds Stamp Set
  • Stitched Rectangle Dies
  • Delicate Lace Dies
  • Scalloped Lace Trim
  • Memento Black
  • Very Vanilla
  • Basic Black
Shop Stampin' Up! products here!


Tasteful Textures on All Black

What a surprise! A Bonus craft day with my friend Tracy. We usually only get together once a month, but the stars aligned for us, so we went for it! We created 3 projects this day and this was the second one.

~Enjoy!


We decided on a sketch challenge Tracy wanted to participate in as well as an "All black" challenge. We chose the colors from the sketch challenge with the big exception that the background had to be black. The colors we used were Granny Apple Green, Bermuda Bay, Smoky Slate, Basic Black and Whisper White.  We both were excited to use the Tasteful Textures bundle. Wait until you see Tracy's card! We only decide on a few elements & then let the day take us where it will - this time it shocked both of us with the results!


The background is new technique, at least for me, where you take a die and cut repeatedly on the background to create a faux embossed pattern, while keeping all the little die cut pieces in place. I really like the effect and this is the second time I have used it. See my Sailing Home example!


Here is the Sketch challenge image and other inspiration from the All Black challenge.


Stampin' Up! products used:
  • Tasteful Textures Bundle
  • Granny Apple Green
  • Bermuda Bay
  • Smoky Slate
  • Basic Black
  • Whisper White  
  • Silver Glimmer Paper
  • Corrugated Embossing Folder
  • Whisper White Baker's Twine
Shop Stampin' Up! products here!


Friday, August 9, 2019

#simplestamping with Sailing Home

This month's Stampin' Up #simplestamping challenge is Birthdays! I always always needing birthday cards since I send out a ton of birthday cards every month! Here is a #simplestampnig card I made for the challenge as well as the #casualstamper and #avidstamper versions.

~Enjoy!


I wanted to create more #simplestamping cards and when I was stamping the envelopes for another card I made, I noticed how pretty it was and thought it would be a great #simplestamping card! I cut down the card front to a 3 x 4.25 Whisper White piece and stamped Anchor from Sailing Home in Soft Suede. I inked up the net from Sea of Textures in Coastal Cabana but only inking around the edges so the center stayed white to add a little highlight to the anchor. The Seaweed is stamped in night of Navy, Pretty Peacock and Soft Suede. The sentiment is stamped with Seaside Notions and Pretty Peacock.


For the #casualtstamper I added a background layer of Pretty Peacock and a strip of Soft Suede embossed with the Corrugated Embossing Folder. A little finishing touch is a bow made from the Braided Linen Trim.


The #avidstamper might like this one a lot because it introduces a new technique (well new to me since I just thought it up - but there have been many who have come before me). I was trying to find something to spruce up the background and I already added an embossing folder layer and I did not want to stamp the seaweed a million times, so I thought it would be cool if I die cut the seaweed from Smooth Sailing Dies but left the pieces in tact. I cut the background in half to make this a little easier, then added 3 strips of Tear & Tape along the backside to hold all of the piece in place, then ran them through my die cut machine. It turned out really cool! The tape did cut in a few places and was a little tricky to get off, but it worked! I added some Silver Glimmer Paper, a bow made from Silver and White Baker's Twine and Silver Sequins. I love it!


Here is a closeup of the "embossed" seaweed and I added a little sparkle with the Wink of Stella Glitter Brush.


Stampin' Up! products used:
  • Sailing Home Stamp Set
  • Sea of Textures Stamp Set
  • Seaside Notions Stamp Set
  • Corrugated Embossing Folder
  • Smooth Sailing Dies
  • Soft Suede
  • Coastal Cabana
  • Night of Navy
  • Pretty Peacock
  • Braided Linen Trim
  • Whisper White
  • Tear & Tape
  • Silver Glimmer Paper
  • Silver and White Baker's Twine
  • Silver Sequins
  • Wink of Stella Glitter Brush
Shop Stampin' Up! products here!


#simplestamping with Soft Spring

This month's Stampin' Up #simplestamping challenge is Birthdays! I always send out a million birthday cards every month, so I am always looking to make more birthday cards! Here is a #simplestamping card I made for the challenge as well as the #casualstamper and #avidstamper versions.

~Enjoy!


When I was stamping the envelopes for another card I made, I noticed how pretty it was just by itself and this card was born! I knew I just wanted a few simple elements so I decided to cut down the card front to a 3 x 4.25 Whisper White piece. Then I stamped The Very Versailles stamp set's script stamp in Sahara Sand. Layered on top of that is the Soft Spring branch in Mossy Meadow and the leaves in Pear Pizzazz stamped off. I added a little more to it by adding the dots from Waterfront in Mint Macaron. The sentiment comes from the Seaside Notions stamp set and is stamped with Pear Pizzazz.


The #casualtstamper may like just a little more, so for this card I added border layer of Mossy Meadow and a strip of Braided Linen Thread and a bow.


This card actually settled somewhere just shy of the #avidstamper I think. I was going to add some die cuts to the bottom left corner to give it more dimension, but I was really liking the simplicity of this card. I added a few champagne sequins from my stash and added a few more stamps to the bottom base layer.


Stampin' Up! products used:
  • Very Versailles Stamp Set
  • Soft Spring Stamp Set
  • Seaside Notions Stamp Set
  • Waterfront Stamp Set
  • Braided Linen Trim
  • Sahara Sand
  • Mossy Meadow
  • Pear Pizzazz
  • Mint Macaron
  • Whisper White
  • Sequins
Shop Stampin' Up! products here!


#simplestamping with Seaside Notions

This month's Stampin' Up #simplestamping challenge is Birthdays! I always always needing birthday cards since I send out a LOT of birthday cards every month! Here is a #simplestampnig card I made for the challenge as well as the #casualstamper and #avidstamper versions.

~Enjoy!


I just love, love, love this little seahorse from the Seaside Notions Stamp Set, he is so super cute!!!! I knew he would make a really cute #simplestamping card. The card front is cut down to a 3 x 4.25 Whisper White piece. The seahorse is stamped in Night of Navy and is surrounded with a sea of seaweed from Sea of Textures and Balmy Blue, Seaside Spray and Soft Suede. The sentiment is stamped with Seaside Notions and Balmy Blue and the dots at the top are from Waterfront stamped in Seaside Spray. Isn't he sweet!


For the #casualtstamper I added a background strip of Soft Suede and a bow made from Night of Navy / Sahara Sand Baker's Twine.


I had all intentions of adding a ton of seaweed dies cuts from the Smooth Sailing Dies set, but once I added some Copper Thread and Copper Sequins and grabbed the Copper Glimmer Paper from Joyous Noel, it just did not look right with the Soft Suede strip stamped with the water lines from Lilypad Lake. So I just added some corner accents with the Glimmer Paper and filled in the void on the white background with some dots from Waterfront stamped in Seaside Spray.


Stampin' Up! products used:
  • Sea of Textures Stamp Set
  • Seaside Notions Stamp Set
  • Waterfront Stamp Set
  • Lilypad Lake Stamp Set
  • Soft Suede
  • Night of Navy
  • Balmy Blue
  • Seaside Spray
  • Whisper White
  • Copper Glimmer Paper Joyous Noel
  • Night of Navy / Sahara Sand Baker's Twine
  • Copper Sequins
Shop Stampin' Up! products here!


Sunday, August 4, 2019

4th of July - #simplestamping

One more #simplestamping idea I had to get out of my head, maybe since the 4th of july just passed and it was America's birthday!

~Enjoy!


This flag is created with Pacific Point and Real Red and the sentiment is again from Itty Bitty Birthdays. Although cute on its own, it was time to dress it up!


As I started to build this card up, it was still not feeling right to me, so I decided it needed some grunge lovin'. I tore up the edges with my scissors, and added Early Espresso ink. I covered up the sentiment with a piece of paper & ran the whole flag through with the Subtle Embossing Folder. The stars are cut from Pacific Point and the retired Confetti Stars Border Punch, that piece is then layered over Silver Glimmer Paper for a little sparkle - what is 4th of July without sparkle? The banner is hand cut and edged in the same ways the card base is done and the whole thing is topped with the Night of Navy / Sahara Sand Baker's Twine. I really like how this one came out!


Stampin' Up! products used:
  • Very Versailles Stamp Set
  • Itty Bitty Birthdays
  • Confetti Stars Border Punch
  • Silver Glimmer Paper
  • Night of Navy / Sahara Sand Baker's Twine
  • Pacific Point
  • Real Red
  • Early Espresso
  • Whisper White
Shop Stampin' Up! products here!


Up & Away - #simplestamping

This little #simplestamping card reminded me of the yellow brick road from the Wizard of Oz.

~Enjoy!


I needed a sentiment that built upon my Oz theme and found this one in the Sea of Textures set. The hearts on the envelope are from Celebrate with Cake. The colors used are So Saffron, Daffodil Delight and Mango Melody. Even as #simplestamping card I think this one is really cute and gives enough of the idea of Oz.


As this card was sitting on my desk & I was trying to decide what other Oz element I had in my stash, my mind kept going to a castle, or ruby slippers, then the characters, of a scarecrow or a lion, but nothing was speaking to me. Then as I was looking for something else, I saw the Up & Away Thinlits balloon set - perfect!!! I wanted to add a little hint of the ruby slippers with some Red Glimmer Paper and tried several different balloons until I pulled out the Copper from the Joyous Noel Glimmer paper pack (now retired) - perfect again! Then just for fun, I Googled the balloon and to my surprise the balloon was a sepia toned and it had a red banner on the front - just like the one I created! Topping this off is some copper & white twine that came with the Layered Leaves Paper Pumpkin. Now I just need to find someone who is going on an adventure!


Stampin' Up! products used:
  • Very Versailles Stamp Set
  • Sea of Textures Stamp Set
  • Up & Away Thinlits
  • Layered Leaves Paper Pumpkin
  • Joyous Noel Glimmer Paper Pack
  • So Saffron
  • Daffodil Delight
  • Mango Melody
  • Call Me Clover
  • Whisper White
Shop Stampin' Up! products here!


Hello Cupcake - #simplestamping

This little #simplestamping card reminded me of rose petals and I thought that is where the #avidstamper card would end up, but I do not care too much for rose stamps so I did not have a great selection to choose from, so it ended up somewhere completely unexpected!

~Enjoy!


The Sentiment is from the Magnolia Blooms set and the colors are Merry Merlot, Rococo Rose and retired Powder Pink.


I played and played with card & could not get anything to work, so I abandoned all hope and decided to pull out a classic, Hello Cupcake! Topping the whole this is the Polk Dot Tulle Ribbon.


Stampin' Up! products used:
  • Very Versailles Stamp Set
  • Magnolia Blooms Stamp Set
  • Hello Cupcake Stamp Set
  • Merry Merlot
  • Rococo Rose
  • Powder Pink.
  • Polk Dot Tulle Ribbon
  • Whisper White
Shop Stampin' Up! products here!