Friday, January 25, 2019

Paper Pumpkin Alternatives #3

I had posted an alternative card for the January Paper Pumpkin using the This Little Piggy stamp set and the hogs & kisses sentiment. This stamp set also has a pig in it that is flying & has the sentiment of She Believed She Could. The Paper Pumpkin set for January 2019 Be Mine Valentine has a stamp in it that says You're So Fly. After I posted my hogs & kisses card a gal mentioned that the flying pig & You're So Fly sentiment would be cute together - challenge accepted!!!

~Enjoy


I decided to create a Z-fold card so I could actually get the pig to fly. Another alternative was to add a little spring behind him, but since I did not have any of those - I decided to go with the Z-fold. After a little card design work, I had to decide where the pig would look best so that he could still fly. This is the Z-fold card closed.


I replicated the stamp technique I used on my hogs & kisses card for the hearts, one says You're so Fly & the other says By My Valentine? I stamped up to 3 times with the photo-polymer before re-inking & sponged the edges with Melon Mambo. They are not straight, but I think they are cuter a little wonky, especially with this little wonky font. You can see the piggy in full flight here. The wings are vellum sandwiched in-between 2 piggies.


I added a little pocket on the inside fold & used one of the hearts from the kit & made it into a tag by stapling some ribbon on the top. The edges of this tag are inked in Wink of Stella as well as my little piggy.


I made an alternate design for just a flat normal card, my piggy is missing his wings in this picture though.


Here is the card in action!


Shop Stampin' Up! products here!

Thursday, January 24, 2019

Paper Pumpkin Alternatives #2

When I was creating my Chinese New Years cards (the year of the pig) I found This Little Piggy stamp set. When I saw him and his sentiment was hogs & kisses I thought I would use some of the January Paper Pumpkin leftovers with him. This is how it turned out!

~Enjoy


Who knew that Stampin' Up! makes a cute little piggy tail embossing folder?! OK, it is actually called Swirls & Curls, but it fits perfectly!!! The red hearts and red heart embellishments are from the January Paper Pumpkin. The red heart paper is from the pillow boxes and the ribbon is retired. Pig & Sentiment are edged with a sponge and Melon Mambo. I also added some Wink of Stella on my piggy because it is Valentine's Day!!!


Now I did have to cut apart my stamp for this next piece. I separated the hogs & kisses sentiment from my little pig because I wanted to use it to create some background paper that said hogs & kisses all over it. As I was playing with setting it up in my Stamparatus, I was not fully inking the stamp - just to see if I was going to like it or not. The cool thing that happened was it started to vary in shades and I really liked it, so as I started to stamp the sentiment I stamped up to 4 times without re-inking to get the different colors - another happy accident! I did end up using my Stamp-a-ma-jig for this technique since I was only making one card and I could not see thru the stamp, even then it is a little wiggly and not perfect.


Another tip I wanted to share was what I did with my sentiment. First, I made it extra long so I could cut some really deep tails. Then with my fingernail, I dragged it across the tails & pulled up so get them to curl slightly. Now you have to imagine splitting your sentiment up into sections, the tails, just inside the tails, then about at 30% & 70% of the length & then the middle. I adhered adhesive to the middle & just before the end of the tails and added dimensionals to the 30% & 70% marks and also the very end tail parts to keep them up/curled. This results in a very wavy ribbon.


Shop Stampin' Up! products here!

Wednesday, January 23, 2019

Chinese New Year 2019

I had submitted a request to Stampin' Up! that they make the animal for Chinese New Year. When I got the annual catalog, then the Holiday Catalog and then the Occasions catalog and found no Chinese New Year stamps set I was a little disappointed. They did have a set called This Little Piggy which I bought because I thought he was super cute.

Then it came time to make my Chinese New Year cards (coming up on Feb 5) & when I went to research what year it was I discovered it was the Year of the Pig! How fortunate!!

~Enjoy


The Year of the Pig colors for 2019 are Red, Gold, Pink and White. The background is made from the Swirls & Curls embossing folder, the white swirls are Spellbinders Draping Vines Elements and Stampin' Up!'s glimmer paper, Numbers are from Stampin' Up!'s Retired numbers set & the pig is from the current catalog and it is called This Little Piggy. I added some Wink of Stella to the pig so he matched the other shiny elements. He is just too cute!!!


Shop Stampin' Up! products here!

Monday, January 21, 2019

Paper Pumpkin Alternatives January 2019

Her are some Paper Pumpkin alternatives for the 2019 January Paper Pumpkin
~Enjoy


More standard out of the box designs. The lips were made from the ends of the pillow boxes cut off.


Now a little more outside of the box.


I started off thinking these would be for my friend Shannon on Valentines day, but I think I will keep these around for when I need some pet cards - I never seem to have them when I need them. Now - for the faint of heart when it comes to cutting stamps - you may want to stop reading...you've been warned!

I have a million "For You, my friend stamps" & honestly - I do not use the ones I have, so I thought I could alter this stamp to say Fur you, my friend, so I got out my micro-scissors and my magnifying glass & very gently cut the top off of the O in the word For. This lopsided style of font allowed for the edit & I think it is really cute. Only after I hacked up my stamp - I found that they had a similar one in the Happy Tails set - oh well!


These cards turned out very pretty but maybe it is the tufted background - all I see is a baby card.


I just love how this card came out, I went back to the paper pumpkin Blissful Bouquet Paper Pumpkin set from a million years ago (but i just received this past weekend) and grabbed the little DSP for the leaves. The envelopes were made with a similar set of stamps from the Incredible Like You set - I just added a little pen detailing to match the DSP

Now this card is a little funky and instead of love I thought it might be cute as an engagement card. Not until I got done & I was thinking of who could I give this too - it is pretty far out there - I thought of my 2 co-workers - who are pretty out there & just got engaged - PERFECT!!


And what the heck - just for fun - a bunny! I still have to decide what to do with him though...


Shop Stampin' Up! products here!

Saturday, January 19, 2019

5 January Swaps with Sale-a-Bration!

After making over 400 cards for moving notifications, Halloween, Christmas and New Years, I found myself signed up for more swaps at a recent event, so I created 92 more! Add in the Mad for Plaid series and the January birthday cards, I have made and personally handed out or mailed over 500 cards in the last 3 months! Here are the most recent ones I needed to make for January swaps I signed up for!

~Enjoy


This first card I started by playing with the cute little 4-leaf clover that came in the Amazing Life Stamp Set. I knew I wanted to make a background paper with it, so I went off to select a few of my favorite staple colors. I am so happy that Stampin' Up! brought back Blackberry Bliss, it is one of my all time favorites! Combined with Crumb Cake & Old Olive it is just perfect! Everything is stamped on Whisper White cardstock and matted on an Old Olive card base.

I wanted the background paper to be the star so I just added small strip of Blackberry Bliss embossed with the Swirls & Curls Embossing Folder and added a small hand cut banner tag stamped with the sentiment and Memento Black Ink and then popped up with Dimensionals. A small bow made from Whisper White 1/8" Sheer Ribbon added the finishing touch!


The moment I saw the wavy lines in the Incredible Like You Stamp Set, I knew I wanted to do something with some small skinny candles. Luckily the set also came with a little flame, ok, it is probably a leaf - but I saw a flame! Once I stamped all the candles on Whisper White Cardstock with Poppy Parade Ink and the flames in Daffodil Delight, I contemplated adding the Memento Black Ink sentiment right on top of the candles but thought it would get lost so decided to stamp it on Vellum instead. I think it makes it pop & added a little more dimension to the candles without breaking that they are really tall skinny candles although it almost looks like striped paper also! I added the black bow made from Black 1/8" Cord and then, tragedy struck.

There was this huge empty space at the top of the card & I did not know what to do with. I am not opposed to white space but this one was just too much. This set on my desk for about 2 weeks taunting me.

One day, I was looking for something else for another project & picked up the Wonderful Moments Stamp Set and while I was looking through it I noticed all these little tiny dots, what the heck were those??? WAIT a minute, those would be cute as little sparks above my candles & fill in that gigantic white space!!!!

Note about this card - I made 20 of them & its is really forgiving when it comes to errors, not all my candle are straight, some of the flames do not touch the right candle and I just noticed that one of the flames is actually straddling 2 candles - oops - but see forgiving!!


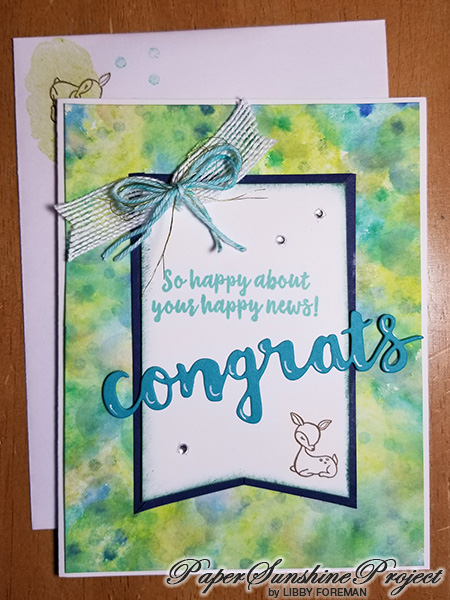
I love the hibiscus flower from the Humming Along Stamp Set - maybe because they were in my front yard as a child so they have fond memories for me. I am not a colorist by any means, ask my friends Shannon & Tracy. So I wasn't sure what to do about this huge empty outlined flower.

I decided to apply the "swoosh" technique. I started with a piece of Whisper White Cardstock and the Granny Apple Green and Highland Heather Ink pads. You take the open ink pad & hold it at about a 22 degree angle (it is almost flat to the paper, you are really only touching the top edge of the ink pad). Then you drag the edge of the ink pad back & forth, mine is done at even a little diagonal of an angle across the card front. Then I switched colors in the middle of the card. You could do a whole rainbow with the effect, but I wanted the purple for the flower & green for the stem & leaf. No measuring, just eyeballed about half way down & went for it!

Again, I was worried that the flower would disappear in the background so I stamped it on vellum. as well as the sentiment.

Once I layered it on the background, the flower was still not popping enough for me so I decided to back the flower with... a flower! I stamped the flower on Highland Heather Cardstock & the leaf on Granny Apple Green Cardstock & hand fussy cut them out. After some strategic glue dots were applied  to the backside of the vellum, I was pretty happy with the overall result.

Adding the finishing touches were the Daffodil Delight Organdy Ribbon from the Sale-a-Bration catalog and some rhinestones and mounting the whole thing onto Daffodil Delight Cardstock card base.

What I intended to be a simple card kept getting more & more difficult and ended up probably being an avid stamper card.


This card you have seen before but it was actually created with this swap in mind and actually turned out to be the inspiration for my New Years cards (of which I made about 85).

I was trying to be conservative with the paper since I knew I wanted to use this for a swap - so I cut the 6x6 into 4 equal parts. I used the Amazing Life set that everyone got at convention. I love the mixed fonts sets. I used just the top portion of the 3-tiered cake, Swirls & Curls embossing folder, gold glimmer paper and the black 1/8" cord. I gradient-colored the word Cake with the light and dark Daffodil Delight blender pens as well as the cake.


The last card I really wanted to make a masculine birthday card, but had the hardest time deciding on a color combo - see the last image, but finally decided that the green one would be good for the swap.
I got a birthday card from my friend Tracy that really inspired this card. She had a stamp set with multiple birthday & friendship greetings in it & inside she stamped them all and wrote - I couldn't decide which one to use - so I used them all! I thought that was so funny! But it inspired me to use all of the birthday greetings in the Itty Bitty Birthdays Stamp Set. I lined them all up on my Stamparatus on a 45 degree angle (eyeballed it again) and it stamped the cutest little strip which I intended to fishtail & turn into a banner. I positioned all of the stamps really closely together - see the Stamparatus picture below.

I pulled out the Corrugated Embossing Folder - my favorite - and layered the hand cut fish-tailed banner. As I was looking through to find another layer I came across a piece of scrap in Soft Suede that was embossed with the Hexagons Embossing Folder and that was a perfect fit for this masculine card!

I roughed up all of the edges and added a small bow from Braided Linen Trim (can't help myself, its not done if it doesn't have a bow), I tried a knot, but it was knot enough (pun & typo intended).


Shop Stampin' Up! products here!

Saturday, January 5, 2019

2019 New Year's Cards

I usually do not like to make New Year's resolutions, but I do like to make New Year's cards for my friends and family! Based on the huge success of the Mad for Plaid yellow birthday card - I decided to base my New Year's cards on that design since the same folks would not be receiving both cards.

I have stopped purchasing patterned paper, I like to make my own and I recently moved and I had to downsize my paper selection, that stuff is HEAVY to move! Between my mother-in-law an myself, I think we have over 3000 pieces of paper, I don't know - it was a LOT! Anyway, I do have a few small 6x6 paper pads that I decided to pull out to see if anything caught my eye. I only have the retired Stampin' Up! Cupcakes and Carousels and also A Little Foxy. In my limited patterned paper stash I found a few I thought I would try so here it goes...

~Enjoy


For the first card I grabbed the Pool Party & Smoky Slate Chevron paper from the A Little Foxy 6x6 paper pack. My friend Shannon loves teal so I was planning with her in mind. I tried to think of something other than embossing for the left side and came across an old retired Project Life Day to Day stamp set for the months stamped in Bermuda Bay on Pool Party. The sentiment is stamped with the Warm Hearted stamp set stamped in Basic Grey. The '19 is from a really old set, I think it was Stampendous - I have had it for years. Some Silver Glimmer paper and a bow made from retired silver and white ribbon finished the card. The whole thing is then layered on a Whisper White embossed with the Subtle embossing folder and layered on a Basic Black card base. The envelope was stamped with the Stampendous numbers in black and the sparkler from the retired Its a Celebration stamp set stamped in Pool Party & the explosions are from the Night in Bethlehem stamp set stamped in Bermuda Bay.


For the stacked months, I attempted to step-stamp with my Stamparatus, but it was not cooperating, so instead I laid out January, March and May on one side of the platform and flipped it over & laid out February, April & June. I then repeated this for the inside for the remaining months. That was a cool discovery.


Another thing I discovered was that once I had missed some ink on a stamp & stamped it again, this created a darker color on every other month. Not what I was going for, but I didn't mind the effect. This also happened on one of the card fronts, so I just matched those 2 up & then it looks like it was intended!


I also ended up making some from the Cupcakes & Carousels utilizing So Saffron Gold Glimmer paper, Crushed Curry for the months and Soft Suede for the sentiment. For the Teal cards I used Memento Black for the sentiment and Bermuda Bay for both the paper & stamped months.


Here is the inspiration card & the copycats.


Shop Stampin' Up! products here!

Tuesday, January 1, 2019

Water-colored Background Baby Card

As I was looking at the Incredible Like You stamp set, I was noticing all of the little blob type stamps and thought they might make a cute background or maybe even a cute base for a water-colored background - so that's what I did - I decided to give it a try!

~Enjoy


I started with 2 watercolor card bases, one I was intentionally going to water-color & the other I was going to leave just stamped and also to use as a reference in case the water color was a success, so I could replicate it.

With the large background flower, I stamped almost all over the card using Lemon Lime Twist and Coastal Cabana. Then I filled in some of the holes with the dot stamp and Pear Pizzazz and Balmy Blue. Lastly I added a few of the 3 small dots stamp in Tranquil Tide and Blueberry Bushel.

I started spritzing water to one of the backgrounds. I actually overdid it and the colors started to get muddy, so I toweled off the paper & started over. The next time, I applied water a little at a time to see when it would start to run and blend. I waited about 30 seconds between each spritz and finally got the look I was going for.


I decided to build the same card with each of the backgrounds to see what would happen. Since the colors slightly shifted I had to adjust each of the cards a little with different colors to get the right color combos.

For the non-water-colored one, I dyed white bakers twine by adding the Tranquil Tide ink pad directly to my craft mat, adding water & dredging my twine through it. It dried lighter than I really wanted it to. I added gold metallic thread to a double twine bow and backed it with some 5/8" Flax Ribbon. The sentiment is from the Abstract Impressions set, the deer is from A Good Day stamp set and the Congrats is cut from Tranquil Tide and the Sunshine Wishes Thinlits dies. The banner is hand cut, edge sponged with Lemon Lime Twist and backed with Old Olive. A few rhinestones in the corners and a little highlighting Congrats with a white gel pen added the finishing touches! That deer is so stinking cute!!!


This is the water-colored version. I dyed white bakers twine by applying the Coastal Cabana ink pad directly to my craft mat, adding water & dredging my twine through it. It dried lighter than I really wanted it to. I added gold metallic thread to a double twine bow and backed it with some 5/8" Flax Ribbon. The sentiment is from the Abstract Impressions set, the deer from A Good Day stamp set and the Congrats is cut from Bermuda Bay and the Sunshine Wishes Thinlits dies. The banner is hand cut, edge sponged with Garden Green and backed with Night of Navy. A few rhinestones in the corners and a little highlighting Congrats with a white gel pen added the finishing touches!


Here is what they ended up looking like - side by side. I think overall I like the non water-colored one better, but it is fun to get inky once in a while!


Shop Stampin' Up! products here!