Sunday, April 30, 2017

Color Challenge Week #4

The first thing I saw for this week's colors was feminine or baby. So I started with some Mother's Day cards since it was right around the corner! I also hinted to Shannon that she was not allowed to use any greens this week – since teal is her favorite color she tends to lean toward that end of the color spectrum!

Here is week #4's inspiration:


The Stampin' Up! colors identified were:

  • Perfect Plum
  • Wisteria Wonder
  • Sweet Sugarplum
  • Flirty Flamingo
  • Blushing Bride
  • Crumb Cake
  • Whisper White

Here is my submission:


Butterflies

I stamped a background of flowers, stamping some directly from ink pad to paper & some flowers were created with a second stamp from the initial inking.

I ran the tan paper through the waves embossing folder and ink edged the entire card front with a sponge, holding the card in my one hand and with the other hand dragging the sponge along the edge starting about an inch in on the card  with a  little bit of a running effort. The card bends slightly & allows just a little of the ink on the card front with a darker inking on the edge. I also applied a little of the sponge to the waves to add a little more depth for the embossed piece.

I layered the background flowers on the sweet sugarplum and popped the whole thing up with Dimensionals.  The banner was fussy cut for both pieces and the right edge is popped up, while the left edge is adhered directly on the flowers background.

I added Wink of Stella to the die cut butterflies and also some rhinestones and pearls.

Supplies:

  • Sweet Sugarplum Ink & Cardstock
  • Wisteria Wonder Ink & Cardstock
  • Baked Brown Sugar Ink & Cardstock
  • Whisper White Cardstock
  • Garden In Bloom Stamp Set
  • Oh So Succulent Stamp Set
  • Detailed Dragonfly Thinlits Dies
  • Waves Embossing Folder
  • Sponges
  • Rhinestones / Pearls
  • Pop Dots / Dimensionals
Shop Stampin' Up! products here!

Happy Birthday Variation


I wanted to use a script background for my submission – but I did not have a current SU one and the rules of the game were current Stampin' Up! products only – so I enhanced some others!

I also wanted to use the Sweet Sugarplum glimmer paper that had just expired with the Sale-A-Bration catalog!  Since I didn't have purple glimmer paper – I switch the background flowers to purple and added the main butterfly in pink instead.

Supplies:

  • Sweet Sugarplum Ink & Cardstock
  • Wisteria Wonder Ink & Cardstock
  • Baked Brown Sugar Ink & Cardstock
  • Whisper White Cardstock
  • Garden In Bloom Stamp Set
  • Detailed Dragonfly Thinlits Dies
  • Waves Embossing Folder
  • Sweet Sugarplum Glimmer Paper
  • Script Background Stamp
  • Happy Birthday Stamp
  • Sponges
  • Pop Dots / Dimensionals
Shop Stampin' Up! products here!

Purple Cake


I had gotten these cute little crooked stacked cake stamps and had been wanting to play with them for a while – so why not with this challenge! I went a little outside of the challenge though – I used Perfect Plum instead of Wisteria Wonder! Renegade!!!! These are two step stamps, they have 2 stamps when stamped together make up the whole piece, so half of these I stamped directly from ink pad to paper – the lighter ones – I stamped ink pad to scrap paper & then onto my project. I wanted the same shade only lighter – which I did not have as an ink option.

I added a piece of Perfect Plum that I ran through a Banners Embossing Folder and a piece of Sweet Sugarplum Glimmer Paper. I popped up the cake on the backgrounds and I also adhered glue dots to my Dimensionals to make sure they would stick to the glitter paper.

I used Blender pens to fill in the little confetti around the cake

Supplies:

  • Perfect Plum Ink & Cardstock
  • Whisper White Cardstock
  • Memento Black Ink
  • Cake Crazy Stamp Set
  • Confetti Stamps
  • Sweet Sugarplum Glimmer Paper
  • Banners Embossing Folder
  • White Ribbon
  • Blender Pens
  • Pop Dots / Dimensionals / Glue Dots
Shop Stampin' Up! products here!

Super Crazy Fantastic Spectacular


After running the Sweet Sugarplum cardstock through the Crackle Embossing Folder, I added some sponged Sweet Sugarplum ink to it to add dimension. I also added a little sparkle to the edges with Wink of Stella.

I popped up the cake / sentiment for additional depth.

I colored the cake on the envelope with Blender Pens.

Supplies:

  • Sweet Sugarplum Ink & Cardstock
  • Wisteria Wonder Ink & Cardstock
  • Baked Brown Sugar Ink
  • Whisper White Cardstock
  • Cake Crazy Stamp Set
  • Birthday Cake Stamp
  • Crackle Embossing Folder
  • Gold Ribbon
  • Sponges
  • Pop Dots / Dimensionals / Glue Dots
Shop Stampin' Up! products here!

Purple & Gold Cake


After adding a little Sweet Sugarplum Glimmer Paper behind my cake with glue dots, I popped up the cake using Dimensionals. I found a really old scrap piece of paper for the starry background that would match the colors I needed. I also keep a stash of tiny bows or scrap ribbon & found the perfect little gold bow as an accent piece.

Supplies:

  • Wisteria Wonder Ink
  • Sweet Sugarplum Ink
  • Baked Brown Sugar Ink & Cardstock
  • Whisper White Cardstock
  • Cake Crazy Stamp Set
  • Sweet Sugarplum Glimmer Paper
  • White & Gold Ribbon
  • Pop Dots / Dimensionals / Glue Dots
Shop Stampin' Up! products here!

Collection:

Here are all the cards for this color challenge that I made.


Here are the group results as well:


~Enjoy!

*Most products used were Stampin' Up!, but occasionally other sources as well

Sunday, April 23, 2017

Color Challenge Week #3

I am LOVING this color challenge idea! When I first saw this week's colors I was feeling a little nauseous. I HATE orange and turquoise as a color combination, so I set out to find a way to soften the contrast. I started to make more of a sunset to sea effect with sponging background papers and I ended up loving this effect and color combos that came out of it. Adding a LOT of white helped to crisp up the look and I ended up loving all 3 cards I made for this challenge. - Oh! and I even won the random prize drawing for this week - AGAIN! I got a whole pack of enamel dots!!

Here is week #3's inspiration:


The Stampin' Up! colors identified were:

  • Mint Macaron
  • Calypso Coral
  • Pool Party
  • Wild Wasabi
  • Tangerine Tango

The backgrounds, but I couldn't decide on the dies for the front:

Here is my submission:


Dragonflies

Using one of the backgrounds I created I then applied the Bokeh effect to it. You apply varying sizes and thicknesses of white ink to a background.

**HOW TO: I used dies or punches & cut circles of different sizes in plastic or heavy cardstock or chipboard. Place this template over your background. Then apply white ink to a dauber and add circular motions inside your template. Pick up & move the template around adding varying sizes and thicknesses of ink. You may need to reapply since the white ink tends to dry lighter. You can use a heat gun to speed up the process. Make sure to hold the template really steady because you want crisp lines on your circles.

**TIP:  Make sure your background is completely dry before adding white ink – or you will get color transfer from your dauber onto your white ink pad.

I cut out the frame by hand with a paper trimmer and an Exacto knife. Then I embossed it with the waves folder and popped it off the background with Dimensionals. I cut more Dimensionals really small and added them behind the dragonfly bodies and added a small amount of adhesive to the wing tips that touched the white frame.

I added VersaMark inked sentiment & heat embossed with white embossing powder. I hand trimmed the sentiment banner.

Supplies:

  • Tangerine Tango Ink
  • Lost Lagoon Ink & Cardstock
  • Daffodil Delight Ink
  • Whisper White Ink & Cardstock
  • Detailed Dragonfly Thinlits Dies
  • Chase Your Dreams Stamp Set
  • Waves Embossing Folder
  • Lost Lagoon Glimmer Paper
  • White Embossing Powder
  • Sponges / Daubers
  • Pop Dots / Dimensionals

Shop Stampin' Up! products here!

Balloon


I layered the background created at top onto base card.

Cut out a cloud out of white glimmer paper. A balloon out of Whisper White and adhered it to Lost Lagoon glimmer paper with glue dots (to adhere to the top of glimmer paper) and fussy cut around the balloon for the glittery background.

I cut out the frame by hand with a paper trimmer and an Exacto knife. Then I embossed it with the clouds folder and popped it off the background with Dimensionals.

I wanted to add the sentiment to the frame – but I could not fit the embossing folder partially through as to not emboss over the sentiment – so I decided to stamp it on a separate piece and place it on top of the frame.

I added Dimensionals to the bottom part of the balloon to pop it up and adhesive to the top of the balloon to adhere it to the frame.

Supplies:

  • Tangerine Tango Ink
  • Lost Lagoon Ink & Cardstock
  • Daffodil Delight Ink
  • Whisper White Cardstock
  • Carousel Birthday Stamp Set
  • Up & Away Thinlits Dies
  • Clouds Embossing Folder
  • White and Lost Lagoon Glimmer Paper
  • Sponges
  • Pop Dots / Dimensionals / Glue Dots

Shop Stampin' Up! products here!

Mr. & Mrs.


I used the backgrounds created from applying sponged ink as stated at top. I then added the dies to the portion of the background that would show through the frame.

I hand cut the frame in glimmer paper and popped it up off of the page using Dimensionals.

I added VersaMark inked sentiment & heat embossed with white embossing powder. I then cut out the sentiment with an oval die and added a small scrap of white ribbon with a glue dot to secure to the glimmer paper.

Supplies:

  • Tangerine Tango Ink
  • Lost Lagoon Ink & Cardstock
  • Daffodil Delight Ink
  • Whisper White Cardstock
  • That's the Tag Stamp Set
  • Stylish Stems Framelits Dies
  • Oval Dies
  • White Glimmer Paper
  • White Ribbon
  • White Embossing Powder
  • Sponges
  • Pop Dots / Dimensionals / Glue Dots

Shop Stampin' Up! products here!

Collection:

Here are all the cards for this color challenge that I made.

Here are the group results as well:


If you are interested in playing along – see Shannon's blog: www.creatingforgrace.com

~Enjoy!

*Most products used were Stampin' Up!, but occasionally other sources as well

Sunday, April 16, 2017

Color Challenge Week #2

I was feeling a little more inspired this week for two reasons, the colors were more up my alley and no restrictions on the stamp set! I submitted one card for the challenge – but created a few more also - I loved this color combo! - Oh! and I even won the random prize drawing for this week! I got some several rolls of washi tape!!

Here is week #2's inspiration:


The Stampin' Up! colors identified were:

  • Any Green
  • Sahara Sand
  • Basic Black
  • Whisper White

Here is my submission:


Dragonfly

I stamped the green polka dots first before running through the star embossing folder.

After stamping the dragonfly, I used a combination of the Always Artichoke and the Garden Green – just making random splat pattern on the wings with a blender pen. Then topped the wings off with clear Wink of Stella. I repeated this on the envelope.

I cut the frames out by hand with an Exacto knife – but you could use nesting square dies as well.

I stamped the sentiment with VersaMark Embossing ink, topped with white embossing powder and heat set. The sentiment is popped up for extra dimension.

Supplies:

  • Always Artichoke Ink & Cardstock
  • Cucumber Crush Ink & Cardstock
  • Whisper White Cardstock
  • Basic Black Cardstock
  • Memento Black Ink
  • Swirly Scribbles Thinlits Dies
  • Dragonfly Dreams Stamp Set
  • Stars Embossing Folder
  • Wink of Stella – Clear
  • Silver Glimmer Paper
  • Blender Pens
  • Pop Dots / Dimensionals

Shop Stampin' Up! products here!

Baking Makes Life Sweeter


I stamped the lime green gloves on a slightly smaller piece of Cardstock than the card front. I glued it in place, then traced around the edge with a fine black pen.

Stamped the spatula, mixing bowl & eggs with VersaMark embossing ink & added white embossing powder & heat set. I then fussy-cut those three items.

Stamped the sentiment, then added the background swash in lime green (stamped off), then I used the circle dies to cut out the sentiment.

**TIP: I use repositionable tape to tape my die to the paper so I get an exact cut that I want – I have found that the magnetic places tend to shift – especially when your cutting plates get well-worn & start to bend.

Matching envelope was made with Blender pens.

Supplies:

  • Cucumber Crush Cardstock
  • Whisper White Cardstock
  • Basic Black Cardstock
  • Memento Black Ink
  • Lemon Lime Twist Ink & Cardstock
  • Perfect Mix Stamp Set
  • Swirly Scribbles Thinlits Dies
  • Work Of Art Stamp Set
  • Circle Dies
  • VersaMark Embossing ink
  • White Embossing Powder
  • Wink of Stella – Clear
  • Blender Pens
  • Pop Dots / Dimensionals

Shop Stampin' Up! products here!

Thanks a Bunch


First, I stamped & cut out a bunch of flowers and the basket. Then I placed them in the general area that I thought I wanted the foreground flowers to be. Then I carefully picked up 1 or 2 of the flowers and stamped the background flower I wanted. Then repeated the process with the stems and leaves.

The flowers were colored with Crayola markers and the leaves were colored with blender pens and inkpads.

The foreground flowers were popped up with Dimensionals.

The tips of flowers were highlighted with Wink of Stella markers. And the entire butterfly as well.

The thanks a bunch stamp came in one line – but I wanted a stacked sentiment – so I added ink carefully to the "thanks a" and stamped and repeated for the "bunch".

I added washi tape for the polka dot borders.

Don't forget to add small dots around the bouquet with a green pen.

Supplies:

  • Cucumber Crush Ink & Cardstock
  • Whisper White Cardstock
  • Basic Black Cardstock
  • Memento Black Ink
  • Daffodil Delight Ink
  • Rust, Yellow, Dark Yellow and Green Crayola Markers
  • Basket Bunch Stamp Set
  • Basket Builder Framelits Dies
  • Tiny Butterfly Dies
  • Polka Dot Washi Tape
  • Wink of Stella – Clear
  • Blender Pens
  • Pop Dots / Dimensionals

Shop Stampin' Up! products here!

Paisley Thanks


I randomly stamped the paisleys to create a background.

The leaves were die cut – but the background black was fussy cut to pop them off the paisley background.

Supplies:

  • Always Artichoke Ink
  • Cucumber Crush Ink & Cardstock
  • Whisper White
  • Basic Black Cardstock
  • Memento Ink
  • Lemon Lime Twist Ink & Cardstock
  • Paisleys & Posies Stamp Set
  • Paisley Framelits Dies
  • White Twine
  • Glue Dots
  • Pop Dots / Dimensionals

Shop Stampin' Up! products here!

Collection:

Here are all the cards for this color challenge that I made.


Here are the group results as well:


If you are interested in playing along – see Shannon's blog: www.creatingforgrace.com

~Enjoy!

*Most products used were Stampin' Up!, but occasionally other sources as well

Sunday, April 9, 2017

Color Challenge Week #1

My friend Shannon Cole decided to start a color challenge for her Stampin' Up! group. She offered up a small prize to a random winner every week! The rules are:
  • Do the best you can with the colors that are presented in the photograph attached
  • All supplies MUST be current Stampin' Up! products
  • An additional challenge this week was to use the Oh So Succulent Stamp set


Here is week #1's inspiration:


The Stampin' Up! colors identified were:

  • Old Olive
  • Pear Pizzazz
  • Rich Razzleberry
  • Night of Navy
  • Pacific Point
  • Whisper White


Here is my submission:


Techniques

My stamp sets are VERY wet, so for all of the outlines I used the stamped image as is. Then for the internal colors, I either stamped off once or used a dauber to lessen the amount of ink on the stamp.

Sponged edges were done by holding the cardstock in my hand & dabbing a sponge in an ink pad, then dragging it along the edges of the cardstock until effect desired resulted.

Lastly, I stamped my sentiment directly on the card, but sure enough - it came out crooked! - So I stamped it again on a scrap piece and popped it up instead! (pictured in group shot below)

Supplies:

  • Old Olive Ink
  • Rich Razzleberry Ink
  • Night of Navy Ink & Cardstock
  • Whisper White Cardstock
  • Daffodil Delight Ink
  • Oh So Succulent Stamp Set
  • Navy Twine
  • Pearls
  • Sponges / Daubers
  • Glue Dots
  • Pop Dots / Dimensionals
***Shop Stampin' Up! products here!***

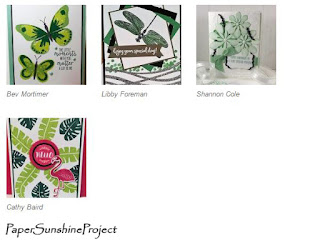
Here are the group results as well:


If you are interested in playing along – see Shannon's blog: www.creatingforgrace.com
~Enjoy!
*Most products used were Stampin' Up!, but occasionally other sources as well