Showing posts with label Scripty 3D Embossing Folder. Show all posts

Sunday, March 29, 2020

NC Demos Blog Hop March 2020 Grapefruit Grove

This is the third item I created for the NC Demos Blog Hop for March 2020 using the retiring In-Color of Grapefruit Grove. Tracy & I had a virtual play date since she is in Washington state & I am in North Carolina, here is her card.

~Enjoy!


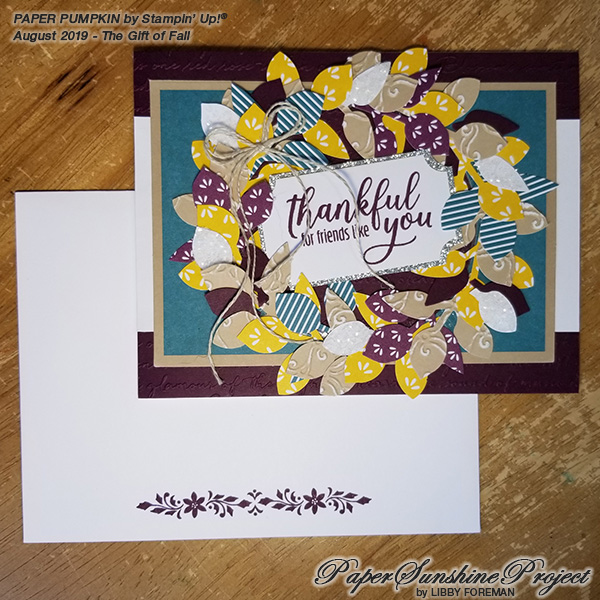
I CASEd another card I had made recently for this one at the time not knowing that I could use silver. The background paper and strip on the left is from Bird Ballad Designer Series Paper. As I am posting this & reviewing the colors in the suite, I not surprised at why my card colors do not look correct, it is because the colors in the suite are Calypso Coral & Petal Pink! oh well, moving forward....

The border dies are half of the teardrop dies from the Lily Pad Dies cut with Whisper White. They are sitting under a border of Grapefruit Grove embossed with the Scripty 3D Embossing Folder. The Flourish & springs are cut with the Flourish Dies. The sentiment is stamped with Grapefruit Grove using the Woven Heirlooms Stamp Set. The bird is fussy cut from the Bird Ballad DSP & the whole thing is topped off with a double bow made from the Whisper White 1/4" Crinkled Seam Binding Ribbon. See all of the cards here!


Now go check out these other amazing projects!!


Here is the collection and you can get the details for each card below!


Stampin' Up! products used:
  • Woven Heirlooms Stamp Set
  • Lily Pad Dies
  • Flourish Dies
  • Scripty 3D Embossing Folder
  • Bird Ballad Designer Series Paper
  • Whisper White 1/4" Crinkled Seam Binding Ribbon
  • Whisper White
  • Grapefruit Grove
Shop Stampin' Up! products here!


Sunday, November 10, 2019

Noble Peacock Foil Pretty Peacock Christmas

Here is the last in the trio of Noble Peacock Foil Sheet cards. This one uses this card as #pinspiration, really it was just using the Scripty 3D and orientation and the rest came from the Noble Peacock Foil Old Olive Christmas card.

~Enjoy!


The background uses the Pretty Peacock from the Noble Peacock Foil Sheets embossed with the Scripty 3D Embossing Folder. The border is cut from Whisper White and one of the Delicate Lace Dies. The sentiment is stamped with Pretty Peacock and a stamp from the Itty Bitty Stamp Set. For the ribbon, I  colored the Seaside Spray Metallic Ribbon with a Pretty Peacock Blends Marker, I love how the sparkle shows though after coloring it! The envelope is stamped with one of my favorite holiday borders from the Dashing Deer Stamp Set and Pretty Peacock, so elegant! 


I decided to do all 3 card focals the same since I loved the Old Olive version so much. Tracy went with snowflakes for her cards, make sure to check it out! I cut Pretty Peacock with the Leaf Punch and topped that off with Ice Stampin' Glitter for extra holiday sparkle! The flower is cut from the large & small flowers from the Flourish Dies and White Glimmer Paper. More leaves were cut from Whisper White and Pool Party and Bouquet Bunch Dies. 


Stampin' Up! products used:
  • Noble Peacock Foil Sheets
  • Itty Bitty Christmas Stamp Set 
  • Dashing Deer Stamp Set
  • Delicate Lace Dies
  • Flourish Dies 
  • Bouquet Bunch Dies
  • Leaf Punch
  • Scripty 3D Embossing Folder
  • Pretty Peacock Blends Marker
  • Ice Stampin' Glitter
  • Seaside Spray Metallic Ribbon
  • White Glimmer Paper
  • Pretty Peacock
  • Pool Party
  • Whisper White
Shop Stampin' Up! products here!


Sunday, October 27, 2019

Winter Woods Paper Pumpkin Alternative Nordic

Boy, oh, boy! Is Paper Pumpkin really stepping up the images in their stamps, this is one of the prettiest sets I have seen and I have wanted to use every stamp!  For this card from the Winter Woods October 2019 Paper Pumpkin, I strictly wanted to focus on the stamps.

~Enjoy!


I stamped the background Whisper White with Real Red using the large snowflake stamp. I then layered that with the all over snow stamp with Versamark and Black Embossing Powder, then the whole thing is layered on a piece of Basic Black. I ran a strip of Real Red though my embossing machine with the Scripty 3D Embossing Folder and bordered that with the Black Glittered Organdy Ribbon and added a bow. The sentiments is stamped with Memento Black Ink on Vellum and layered over the snowflake stamped in Real Red and then trimmed out with the silver strips from the envelopes.  


Stampin' Up! products used:
  • Winter Woods Paper Pumpkin
  • Scripty 3D Embossing Folder
  • Black Glittered Organdy Ribbon
  • Black Embossing Powder
  • Memento Black Ink
  • Versamark 
  • Vellum 
  • Basic Black
  • Whisper White
  • Real Red
Shop Stampin' Up! products here!


Sunday, October 13, 2019

Magnolia Lanes meets Nature's Beauty

This card uses the 1" x 4" strip from Magnolia Lane for a #onesheetwonder

~Enjoy!


The background is embossed with the Scripty 3D on Soft Sea Foam and edge inked with Soft Sea Foam. The frame is cut from Frosted Frames Dies and the fox fis from Nature's Beauty and stamped in Basic Gray. I did a little fussy cutting on the fox & he is layered, but you cannot tell from the picture. He is also sporting a cocat of Wink of Stella to give him a little frosty fur. The sentiment is from Well Written Dies and cut from Silver Glimmer Paper. The holly is cut from Mossy Meadow and the Christmas Layers Dies.


Here is the paper cutting template that I obtained from my wonderful group of North Carolina Demonstrators! For the right column however, we just cut one strip that was used on the pink card. Check out Tracy's card where she used the bunny from this set, she also used the same sized strip for this card as I did.


Stampin' Up! products used:
  • Nature's Beauty Stamp Set
  • Frosted Frames Dies
  • Well Written Dies
  • Christmas Layers Dies
  • Magnolia Lane Designer Series Paper
  • Scripty 3D Embossing Folder
  • Silver Glimmer Paper
  • Wink of Stella
  • Mossy Meadow
  • Soft Sea Foam
  • Basic Gray
Shop Stampin' Up! products here!


Friday, September 27, 2019

Birch Background Technique with Detailed Deer Dies

For the September North Carolina Stampin' Up! Demonstrators meeting, I signed up for a second (and a third and a fourth and a fifth!) display board for the event. I just love, love, love the Birch Background stamp and after being limited by the artwork of the other sets, I thought a background would free me up creatively, so my friend Tracy & I decided to split the 6 cards we had to make. Tracy travels full time & does not have a demonstrator group home base and she is always up for a challenge, so she gladly wanted to play along!

~Enjoy!


I started out with another color combo for this card, black, white and red which came out beautiful & I will post it shorty, but I only used the Smokey Slate with the Birch Background Stamp, but I wanted to give it a little more drama. So I decided on another color combo of Merry Merlot, Melon Mambo, Blushing Bride and Crumb Cake. The banner is embossed with the Swirls & Curls Embossing Folder. The reindeer is cut from the Detailed Deer Dies and Silver Glimmer Paper and the background is embossed using the Scripty 3D Embossing Folder. The sentiment is from the Itty Bitty Christmas Stamp Set and is hand trimmed. The reindeer has a little extra bling with a rhinestone collar colored with Cherry Cobbler Blends Markers. The whole thing is topped off with White Bakers Twine, Whisper White Polka Dot Tulle Ribbon and Silver Metallic Thread.


So here is where the magic is! I picked up my stamp & inked it with Melon Mambo, since the banner was Merry Merlot and the background was Crumb Cake. Then I wanted more. So I inked up my stamp again in Merry Merlot and turned my stamp 180 degrees from the first stamp, since I wanted to fill in the spaces & not stamp again over what I had done before. It was looking pretty good and then I decided it still needed more! So I grabbed Blushing Bride and inked it up & then moved my stamp 50% off the page (top half no stamp, bottom half stamp). Then I repeated this technique and stamped the top half. I love, love, love how this came out! I even shared this technique with Tracy & she used it on her card too! I tried this with a few other color combos & I will post the results soon.

Make sure to hop on over to Tracy's blog to see what she did with this technique and the Let it Ride Stamp Set. She also did a beautiful card using the Nature's Beauty Stamp Set and the fox. Also see my inspiration card


Stampin' Up! products used:
  • Birch Background Stamp Set
  • Itty Bitty Christmas Stamp Set
  • Detailed Deer Dies
  • Swirls & Curls Embossing Folder
  • Scripty 3D Embossing Folder
  • Cherry Cobbler Blends Markers
  • Merry Merlot
  • Melon Mambo
  • Blushing Bride
  • Crumb Cake
  • Whisper White
  • Silver Glimmer Paper
  • Rhinestones
  • White Bakers Twine
  • Whisper White Polka Dot Tulle Ribbon
  • Silver Metallic Thread
Shop Stampin' Up! products here!


Birch Background meets Seasonal Layers Dies

Here is another card using the Birch Background Stamp Set. I made this card as part of a Paper Pumpkin in some other colors & so fully loved it, I decided to replicate for this display board / challenge.

~Enjoy!


The Daffodil Delight background is embossed with the Scripty 3D Embossing Folder & mounted on Pumpkin Pie. The White interior is stamped with Soft Suede using the Birch Background Stamp. The circles are cut from the Layering Circles Dies set. The Flowers are dies cut from the Seasonal Layers Dies and Granny Apple Green. The sentiment is from Beauty Abounds stamp Set and the envelope is decorated with flowers from the Colorful Seasons Stamp Set. The whole thing is topped with the 1/4" Copper Trim and some rhinestones colored with the Bronze Stampin Blends Marker gives a little sparkle! 


Stampin' Up! products used:
  • Birch Background Stamp Set
  • Beauty Abounds Stamp Set
  • Colorful Seasons Stamp Set
  • Seasonal Layers Dies
  • Layering Circle Dies
  • Scripty 3D Embossing Folder
  • 1/4" Copper Trim 
  • Rhinestones 
  • Bronze Stampin Blends Marker
  • Daffodil Delight
  • Granny Apple Green
  • Pumpkin Pie
  • Soft Suede
  • Whisper White
Shop Stampin' Up! products here!


Monday, September 16, 2019

Bone Appetit Boxes as Backgrounds

I was looking for some additional ways to use the "background papers" for the Bone Appetit Paper Pumpkin September 2019 kit.

~Enjoy!


I decided since they had a white core to emboss them & scruff them up with a sanding block to soften the very bright & shiny orange metallic. From Left, I used the Subtle Embossing Folder, Stylish Scroll Embossing Folder and the Scripty 3D Embossing Folder. For the bottom 2 under the skeleton, I scruffed them up with the point of my scissors. They turned out super cute & cannot wait to see what gets created with them!


Stampin' Up! products used:
  • Bone Appetit Paper Pumpkin September 2019
  • Subtle Embossing Folder
  • Stylish Scroll Embossing Folder
  • Scripty 3D Embossing Folder
Shop Stampin' Up! products here!


Monday, September 9, 2019

#simplestamping with Beauty Abounds Color Challenge Spring

The Beauty Abounds set here is used with another color challenge of Pear Pizzazz, Pineapple Punch, Seaside Spray and Rococo Rose. The #simplestamping version of this one is just beautiful!

~Enjoy!


The #casualcrafter card uses the Scripty 3D Embossing Folder (this is one of my new favorite things!!) and the Seaside Spray Metallic Ribbon.


Stampin' Up! products used:
  • Beauty Abounds Stamp Set
  • Pear Pizzazz
  • Pineapple Punch
  • Seaside Spray
  • Rococo Rose
  • Scripty 3D Embossing Folder
  • Seaside Spray Metallic Ribbon
Shop Stampin' Up! products here!


Sunday, August 18, 2019

Gift of Fall Paper Pumpkin Colorful Banner 2

Using my favorite element from the September 2019 Paper Pumpkin: Gift of Fall, the colorful leaves banner, did not result as pretty as I had hoped...

~Enjoy!


I started with the Mossy Meadow background and embossed it with the Layering Leaves Embossing Folder. I scruffed up the edges of the colorful leaves banner. I embossed the circle with the Scripty 3D Embossing Folder & then lightly sanded to have the white core show through. The additional little sprigs are cut from the retired Bird Builder Punch, which matched almost perfectly to the supplied sprigs. The sentiment is stamped with Merry Merlot and then the edges were sanded & then roughed up with a scissor edge to add a little texture. The Crushed Curry background is stamped with Crushed Curry and the line stamp from Tasteful Textures.


I colored the Ice Stampin' Glitter crystals with some Mossy Meadow Ink Refill and adhered then with Shimmery Crystal Effects. A few gold sequins add just a little sparkle! 


Stampin' Up! products used:
  • September 2019 Paper Pumpkin: Gift of Fall
  • Tasteful Textures Stamp Set
  • Layering Leaves Embossing Folder
  • Scripty 3D Embossing Folder
  • Bird Builder Punch
  • Ice Stampin' Glitter
  • Shimmery Crystal Effects
  • Mossy Meadow Ink Refill 
  • Mossy Meadow
  • Merry Merlot
  • Crushed Curry 
Shop Stampin' Up! products here!


Gift of Fall Paper Pumpkin White Core

I stole this idea for my friend Tracy over at Stuff-n-Thingz and I used it on almost every card I made for this set! It is called White Core.

~Enjoy!


This kit came with the card backs that were Crumb Cake, Watercolor Wash Sunset or Pretty Peacock on one side & Whisper White on the other, which means the color is layered over white causing the paper in general to have a white core. What is nice about white core cardstock, is when you emboss it, as I have done here & then take some kind of sanding block & gently rub over the raised area, the color falls away & you are left with the white peaking through, I love this technique! The Embossing folders used below are Scripty 3D, Layered Leaves and Stylish Scroll, I think the more intricate the embossing folder is the better the results.


Stampin' Up! products used:
  • September 2019 Paper Pumpkin: Gift of Fall
  • Scripty 3D Embossing Folder
  • Layered Leaves Embossing Folder
  • Stylish Scroll Embossing Folder
Shop Stampin' Up! products here!


Gift of Fall Paper Pumpkin Sunset

This card uses one of my favorite elements from any Paper Pumpkin ever, the colorwash sunset from the September 2019 Paper Pumpkin: Gift of Fall Add On.

~Enjoy!


This card starts off with a piece of Merry Merlot background paper. Then I ran the card base provided with the Gift of Fall Add On through the embossing machine with the Scripty 3D Embossing Folder. I then lightly sanded the top of the sunset paper to expose the white core of the paper. I scruffed up the edges of the paper and added a few additional sprigs cut from Merry Merlot, Crushed Curry & the Leaf Punch. The sentiment is stamped with Merry Merlot and layered over Silver Glimmer Paper


The whole thing is then topped off with a double bow made from the Linen Thread. I also made a version of this using Pumpkin as a background and Gold Glimmer Paper under the sentiment. 


Stampin' Up! products used:
  • September 2019 Paper Pumpkin: Gift of Fall
  • Gift of Fall Add On 
  • Scripty 3D Embossing Folder
  • Leaf Punch
  • Silver Glimmer Paper
  • Merry Merlot
  • Crushed Curry
Shop Stampin' Up! products here!


Gift of Fall Paper Pumpkin Wreath

This was one of the first cards I tackled - what was I going to do with all of those little tiny leaves? I love how it came out but it was definitely a labor of love!

~Enjoy!


Let's start with the easy part, the background. I embossed a piece of Blackberry Bliss with the Scripty 3D Embossing Folder, layered with a piece of white & 2 trimmed down pieces of the Gift of Fall add on cards with the Pretty Peacock Wreath removed. The sentiment is stamped with Blackberry Bliss & layered over a piece of Silver Glimmer Paper. The whole thing is topped off with a double bow made with the Linen Thread. 


Now let's talk about those leaves! I trimmed assorted leaves with several papers and the Leaf Punch to match the Blackberry Bliss & Pretty Peacock leaves that came with the kit. The Crushed Curry ones came from the envelope flaps and then I supplemented some plain Blackberry Bliss ones from cardstock. With the Gift of Fall add on cards, I used some of the Crumb Cake card bases and ran them through my embossing machine with the Stylish Scroll Embossing Folder and then sanded the tops of the paper lightly to release the white core.  Lastly, I punched some leaves with Whisper White & added some Ice Stampin' Glitter crystals adhered with Shimmery Crystal Effects.


Stampin' Up! products used:
  • September 2019 Paper Pumpkin: Gift of Fall
  • Gift of Fall Add-on
  • Leaf Punch
  • Scripty 3D Embossing Folder
  • Stylish Scroll Embossing Folder
  • Silver Glimmer Paper
  • Linen Thread
  • Ice Stampin' Glitter
  • Shimmery Crystal Effects
  • Blackberry Bliss
  • Whisper White 
Shop Stampin' Up! products here!


Gift of Fall Paper Pumpkin Banner

Here is another alternative for the September 2019 Paper Pumpkin: Gift of Fall using the envelope flaps as background paper.

~Enjoy!


I layered 3 envelope flaps on Whisper White & used that as the background for this card. I then layered that over a Garden Green strip and Whisper White card base. The banner is made from an envelope & embossed with the Subtle Embossing Folder. The circle was embossed with the Scripty 3D Embossing Folder & then lightly sanded to have the white core show through.  The additional little sprigs are cut from the Flourish Dies. The sentiment is stamped with Soft Suede and then roughed up with a scissor edge to add a little texture. 


The ribbon is colored with Crumb Cake Blends Marker which dulled the bright yellow ribbon down to a more suitable color and I added a little Gold Glimmer Paper and a few gold sequins to add a little bling.   


Stampin' Up! products used:
  • September 2019 Paper Pumpkin: Gift of Fall
  • Layering Circles Dies
  • Flourish Dies
  • Subtle Embossing Folder
  • Scripty 3D Embossing Folder
  • Crumb Cake Blends Marker 
  • Gold Glimmer Paper 
  • Whisper White
  • Garden Green
  • Soft Suede
  • Crushed Curry
  • Vellum
Shop Stampin' Up! products here!


Gift of Fall Paper Pumpkin Sprigs

This card uses up some of the vellum sprig elements from the September 2019 Paper Pumpkin: Gift of Fall.

~Enjoy!


This one turned out to be one of my favorite cards, using one of my favorite elements, the vellum sprigs! The sprigs are layered on Whisper White & cut with the Layering Square Dies. Those are then layered on Merry Merlot cut with the Delicate Lace Dies. The background uses a technique I stole from Tracy. This kit came with the card backs that were Crumb Cake on one side & Whisper White on the other, which means the crumb cake is layered over white causing the paper in general to have a white core. What is nice about white core cardstock, is when you emboss it, as I have done here with the Scripty 3D Embossing Folder & then take some kind of sanding block & gently rub over the raised area, the Crumb Cake falls away & you are left with the white peaking through, I love this technique! 


I added a bit of Gold Glimmer Paper for a little extra bling and the whole thing is topped with another favorite, a double bow made with Linen Thread. The envelopes are stamped with a retired sprig & berries set.  


Stampin' Up! products used:
  • September 2019 Paper Pumpkin: Gift of Fall
  • Layering Squares Dies
  • Delicate Lace Dies
  • Scripty 3D Embossing Folder
  • Gold Glimmer Paper 
  • Linen Thread
  • Whisper White
  • Merry Merlot 
  • Crumb Cake
Shop Stampin' Up! products here!


Friday, August 2, 2019

Digital Retreat August #4 - Very Versailles - #simplestamping

I am not quite sure what exactly happened with the third card of the Very Versailles / #simplestamping project, or should I say the third and fourth cards. This time we worked on the leaves going across. Maybe it was because we did not have an inspiration for this one, we were just winging it, but I did not like my first attempt at #simplestamping so I made a quick second version which I liked much better. Tracy actually went through 4 versions!

~Enjoy!


This time we used Mossy Meadow, Crumb Cake and Black on Very Vanilla. Here is attempt number one for me. It did not look too bad until I dropped the lid of my Memento Black onto the left edge of the card, so an addition of the baroque stamp came in to play & that is when things really fell off the rails. I added an additional baroque frame to the top left to balance the imagery and then wondered what it would look like to frame the sentiment, well, here is what that looks like.


So I started over again with a little less going on in the bottom right corner and it was feeling better balanced for me. Check out how Tracy's #simplestamping version!


I decided to tackle the horrible version first and threw caution to the wind and just started piling stuff on without a second thought. It was already ruined, how could it get any worse, right? I started off by grunging it up by roughing up the edges with a scissor edge and adding sponged Crumb Cake around the edges. I embossed a piece of vellum with the Scripty 3D Embossing Folder and added a little Crumb Cake to it too.

I had some Glimmer paper from the retired Myths & Magic set and cut a small border to lay behind the Braided Linen Thread and to give it a little sparkle. The sentiment is from the Itty Bitty Birthdays stamp set and it is finished off with 2 leaves from the Bird Ballad Trinkets. Overall a vast improvement and now I love the card. If I changed anything it would be to find a better suited glimmer paper, but I searched through my stash and found nothing better. 


The last card of the day came together fairly quickly, since I decided to grunge the version above, I wanted to leave this version clean and classy. The background was embossed with the Subtle Embossing Folder. The Gold Glimmer Paper really helped this card along and it almost has a Christmas feel to it now. I incorporated a die cut from the Flourish Dies set and used the leftover scrap of vellum from the above card and it is finished with the Gold Metallic Edge Ribbon. Check out how Tracy did her card!


Stampin' Up! products used:
  • Very Versailles stamp set
  • Itty Bitty Birthdays stamp set
  • Flourish Dies
  • Subtle Embossing Folder
  • Scripty 3D Embossing Folder
  • Myths & Magic Glimmer Paper
  • Braided Linen Thread
  • Bird Ballad Trinkets
  • Gold Glimmer Paper
  • Gold Metallic Edge Ribbon
  • Mossy Meadow
  • Crumb Cake
  • Memento Black
  • Very Vanilla
Shop Stampin' Up! products here!


Sunday, July 21, 2019

On My Mind Paper Pumpkin Alternative Peacock Butterfly

I just loved the Pretty Peacock envelope liner from the July 2019 On My Mind Paper Pumpkin and it really inspired me and here I to repurposed a favorite layout.

~Enjoy!


For the background I layered a piece of DSP from the envelope liner and some Crumb Cake layered over a Whisper White card base. I wanted to use the medallion stamp included in the kit and remembered a similar layout that I had done before. I stamped the medallion on Whisper White with Pretty Peacock. I then sponged the edges of all 3 layered elements with Soft Suede as well as the sentiment cut with the Decorative Label Punch. The butterfly is from the Beauty Abounds Dies cut in Coastal Cabana and some retired Bermuda Bay Glimmer Paper from the Myths & Magic Paper Pack. The sentiment is one of my favorite birthday sentiments from my stash. I ran some Vellum through my embossing machine with the Scripty 3D Embossing Folder and tied the whole thing up with a bow made from the Braided Linen Trim.


Stampin' Up! products used:
  • On My Mind Paper Pumpkin
  • Beauty Abounds Dies
  • Decorative Label Punch
  • Scripty 3D Embossing Folder
  • Braided Linen Trim
  • Bermuda Bay Glimmer Paper
  • Myths & Magic Paper Pack
  • Vellum 
  • Crumb Cake
  • Pretty Peacock
  • Soft Suede
  • Coastal Cabana
  • Whisper White
  • Dimensionals
Shop Stampin' Up! products here!


Sunday, July 15, 2018

Picnic Paradise Paper Pumpkin 6-pack

The Picnic Paradise Paper Pumpkin kit from July 2018 is so cute, I had lots pinspiration  and fun with this kit!

~Enjoy!


I used the leftover piece from the Blueberries for the focal piece. Behind that is a piece of Whisper White stamped with the Birch Background Stamp and Crumb Cake. I embossed a piece of Daffodil Delight with the Scripty 3D Embossing Folder & layered that over a piece of Blueberry Bushel. The flowers are punched with the Petite Petal Flower Punch in Whisper White and Granny Apple Green. The yellow centers are some flower sequins from Doodlebug and they are topped off with some gold rhinestones colored with a Bronze Blends Marker. The finished touch is some White and Copper Baker's Twine. I loved this card so much, I duplicated it for a swap recently!


Stampin' Up! products used:
  • Picnic Paradise Paper Pumpkin
  • Birch Background Stamp
  • Scripty 3D Embossing Folder
  • Petite Petal Flower Punch
  • Bronze Blends Marker
  • Whisper White
  • Crumb Cake
  • Daffodil Delight
  • Blueberry Bushel
  • Granny Apple Green
  • Rhinestones
  • White and Copper Baker's Twine
Shop Stampin' Up! products here!