Friday, September 27, 2019

Sailing Home Faux Embossing

Since I moved to North Carolina, I found a great group of Stampin' Up! Demonstrators to have the great privilege to hang out with twice a year where about 150 or so demonstrators from across North Carolina meet, craft & network. For the September meeting, they were looking for volunteers to make display boards for the event. At the time, I was heavily crafting with the Sailing Home Stamp Set since it was new to the catalog AND it coordinated with the July Paper Pumpkin "On My Mind". So I signed up to make 6 cards for the display board showcasing the stamps with a fall/winter theme. Here is the first card I made in the collection.

~Enjoy!


This card was sparked from a #simplestamping card I made. I started by adding a background layer of Pretty Peacock and a strip of Soft Suede embossed with the Corrugated Embossing Folder. The colors on the card are Pretty Peacock, Night of Navy and Soft Suede. The net and seaweed is from Sea of Textures and the sentiment is from Seaside Notions. For the net, I only stamped around the edges of the net so the center stayed white to highlight the anchor.


I was trying to find something to spruce up the background and I already added an embossing folder layer and I did not want to stamp the seaweed a million times, so I thought it would be cool if I die cut the seaweed from Smooth Sailing Dies but left the pieces in tact. I cut the background in half to make this a little easier, then added 3 strips of Tear & Tape along the backside to hold all of the piece in place, then ran them through my die cut machine. It turned out really cool! The tape did cut in a few places and was a little tricky to get off, but it worked! I added some Silver Glimmer Paper, a bow made from Silver and White Baker's Twine and Silver Sequins. I love it!


Stampin' Up! products used:
  • Sailing Home Stamp Set
  • Sea of Textures Stamp Set
  • Seaside Notions Stamp Set
  • Smooth Sailing Dies
  • Corrugated Embossing Folder
  • Pretty Peacock
  • Night of Navy
  • Soft Suede
  • Whisper White
  • Silver Glimmer Paper
  • Silver & White Baker's Twine
  • Sequins
Shop Stampin' Up! products here!


Birch Background Technique with Detailed Deer Dies

For the September North Carolina Stampin' Up! Demonstrators meeting, I signed up for a second (and a third and a fourth and a fifth!) display board for the event. I just love, love, love the Birch Background stamp and after being limited by the artwork of the other sets, I thought a background would free me up creatively, so my friend Tracy & I decided to split the 6 cards we had to make. Tracy travels full time & does not have a demonstrator group home base and she is always up for a challenge, so she gladly wanted to play along!

~Enjoy!


I started out with another color combo for this card, black, white and red which came out beautiful & I will post it shorty, but I only used the Smokey Slate with the Birch Background Stamp, but I wanted to give it a little more drama. So I decided on another color combo of Merry Merlot, Melon Mambo, Blushing Bride and Crumb Cake. The banner is embossed with the Swirls & Curls Embossing Folder. The reindeer is cut from the Detailed Deer Dies and Silver Glimmer Paper and the background is embossed using the Scripty 3D Embossing Folder. The sentiment is from the Itty Bitty Christmas Stamp Set and is hand trimmed. The reindeer has a little extra bling with a rhinestone collar colored with Cherry Cobbler Blends Markers. The whole thing is topped off with White Bakers Twine, Whisper White Polka Dot Tulle Ribbon and Silver Metallic Thread.


So here is where the magic is! I picked up my stamp & inked it with Melon Mambo, since the banner was Merry Merlot and the background was Crumb Cake. Then I wanted more. So I inked up my stamp again in Merry Merlot and turned my stamp 180 degrees from the first stamp, since I wanted to fill in the spaces & not stamp again over what I had done before. It was looking pretty good and then I decided it still needed more! So I grabbed Blushing Bride and inked it up & then moved my stamp 50% off the page (top half no stamp, bottom half stamp). Then I repeated this technique and stamped the top half. I love, love, love how this came out! I even shared this technique with Tracy & she used it on her card too! I tried this with a few other color combos & I will post the results soon.

Make sure to hop on over to Tracy's blog to see what she did with this technique and the Let it Ride Stamp Set. She also did a beautiful card using the Nature's Beauty Stamp Set and the fox. Also see my inspiration card


Stampin' Up! products used:
  • Birch Background Stamp Set
  • Itty Bitty Christmas Stamp Set
  • Detailed Deer Dies
  • Swirls & Curls Embossing Folder
  • Scripty 3D Embossing Folder
  • Cherry Cobbler Blends Markers
  • Merry Merlot
  • Melon Mambo
  • Blushing Bride
  • Crumb Cake
  • Whisper White
  • Silver Glimmer Paper
  • Rhinestones
  • White Bakers Twine
  • Whisper White Polka Dot Tulle Ribbon
  • Silver Metallic Thread
Shop Stampin' Up! products here!


Seaside Notions for Christmas

For the September North Carolina Stampin' Up! Demonstrators meeting, I signed up for a third display board for the event. I just fell in love with Seaside Notions before I even even got a chance to play with it. For the event, the challenge was to use items from the annual catalog and change the theme for fall and winter. How do you make a cute loveable little seahorse fall or winter? I started off thinking this would be a great card for our friends in Australia or the southern US states.

~Enjoy!


This card uses Cherry Cobbler, Shaded Spruce, Night of Navy, Soft Suede and Coastal Cabana. I started out with just the seahorse and to CASE myself from a #simplestamping project I had done a few weeks back. Once I added the background strip stamped in Shaded Spruce, I was looking at the shape & thought it would make cute little antlers for my seahorse! The antlers are colored with Cajun Craze from Watercolor Pencils Assortment 2 and since I used the real estate for my bow for the antlers, I struggled with what to put at the top (at think at this point my sentiment from the Making Christmas Bright Stamp Set was already stamped). After a good little while, I noticed that the sand dollar would make a cute wreath! Why wouldn't the seahorse have a sand dollar wreath? The wreath is layered with Silver Metallic Thread and a bow from White Bakers Twine inked with Cherry Cobbler Blends Markers.


And what Christmas card does not need more bling!? I layered the pieces with some Silver Glimmer Paper corners. I added a few rhinestones at the bottom and wanted to play with the Ice Stampin' Glitter. I adhered a few flakes with the Shimmery Crystal Effects. And any reindeer/seahorse worth his weight in gold, MUST have a red nose! So I added a rhinestone colored with a Cherry Cobbler Blends Marker. He is so super cute!


Stampin' Up! products used:
  • Seaside Notions Stamp Set
  • Making Christmas Bright Stamp Set
  • Cajun Craze / Watercolor Pencils Assortment 2
  • Cherry Cobbler
  • Shaded Spruce
  • Night of Navy
  • Crumb Cake
  • Coastal Cabana
  • Whisper White
  • Silver Glimmer Paper
  • Cherry Cobbler Blends Markers
  • White Bakers Twine
  • Silver Metallic Thread
  • Ice Stampin' Glitter
  • Shimmery Crystal Effects
  • Rhinestones
Shop Stampin' Up! products here!


Very Versailles Collection #2


Shop Stampin' Up! products here!


Very Versailles Collection #1


Shop Stampin' Up! products here!


Very Versailles Vintage Christmas


Shop Stampin' Up! products here!


Very Versailles Fall Harvest


Shop Stampin' Up! products here!


Very Versailles Fall Rainbow


Shop Stampin' Up! products here!


Very Versailles Fall Foliage


Shop Stampin' Up! products here!


Very Versailles meets Frosted Foliage


Shop Stampin' Up! products here!


Very Versailles Golden Christmas


Shop Stampin' Up! products here!


Very Versailles Christmas Holly


Shop Stampin' Up! products here!


Sailing Home meets High Seas


Shop Stampin' Up! products here!


Sailing Home Fall Lighthouse


Shop Stampin' Up! products here!


Sailing Home Christmas Love


Shop Stampin' Up! products here!


Birch Background Collection #2

Her are the 6 cards I made for my collection based on the Birch Background Stamp Set and the display boards for the NC Quarterly meeting!

~Enjoy!


Ultimately some of these did not make the cut, but I was very happy with the collection as a whole! See more details on each card with the following links!


Shop Stampin' Up! products here!


Birch Background Collection #1

Here is the final collection of cards made with the Birch Background stamp made for the display boards for the NC Demos quarterly meeting in September!

~Enjoy!


My cards are:

Tracy's card are:
See what Tracy had to say about the collection! 


Shop Stampin' Up! products here!


Birch Background meets Wonderfully Wicked

Ooooooohhhh, how cute is this card!?!?! It did not end up making the display board, but it still turned out super cute!

~Enjoy!


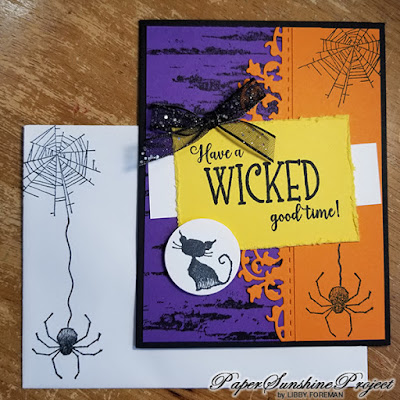
This time the Birch Background Stamp is stamped with Memento Black ink on Gorgeous Grape. All of the other stamps are from the Wonderfully Wicked Stamp Set, isn't this set so super cute? The Pumpkin Pie border was cut from the Delicate Lace Dies and the Daffodil Delight sentiment card was roughed up with a scissor edge. The whole thing is topped off with a bow made from the very sparkly Black Glittered Organy Ribbon, I love this ribbon! 


Stampin' Up! products used:
  • Birch Background Stamp Set
  • Wonderfully Wicked Stamp Set
  • Delicate Lace Dies
  • Black Glittered Organy Ribbon 
  • Memento Black
  • Gorgeous Grape
  • Pumpkin Pie
  • Daffodil Delight
Shop Stampin' Up! products here!


Birch Background meets Seasonal Layers Dies

Here is another card using the Birch Background Stamp Set. I made this card as part of a Paper Pumpkin in some other colors & so fully loved it, I decided to replicate for this display board / challenge.

~Enjoy!


The Daffodil Delight background is embossed with the Scripty 3D Embossing Folder & mounted on Pumpkin Pie. The White interior is stamped with Soft Suede using the Birch Background Stamp. The circles are cut from the Layering Circles Dies set. The Flowers are dies cut from the Seasonal Layers Dies and Granny Apple Green. The sentiment is from Beauty Abounds stamp Set and the envelope is decorated with flowers from the Colorful Seasons Stamp Set. The whole thing is topped with the 1/4" Copper Trim and some rhinestones colored with the Bronze Stampin Blends Marker gives a little sparkle! 


Stampin' Up! products used:
  • Birch Background Stamp Set
  • Beauty Abounds Stamp Set
  • Colorful Seasons Stamp Set
  • Seasonal Layers Dies
  • Layering Circle Dies
  • Scripty 3D Embossing Folder
  • 1/4" Copper Trim 
  • Rhinestones 
  • Bronze Stampin Blends Marker
  • Daffodil Delight
  • Granny Apple Green
  • Pumpkin Pie
  • Soft Suede
  • Whisper White
Shop Stampin' Up! products here!


Birch Background meets Daisy Lane Bundle

Here is one of the cards I made for the display boards for the NC demo meeting I was attending in September. The inspiration card can be seen here, but I must admit, I am sooooo in love with the final version!

~Enjoy!


The background uses the Tin Tile 3D Embossing Folder and Blackberry Bliss and is mounted on Crumb Cake. The Heart is cut from Crumb Cake and inked with Early Espresso and the Birch Background Stamp and cut with the Stitched Be Mine Dies. The Sentiment is stamped with the Country Home Stamp Set and a little Gold Glimmer Paper to give it some bling. Linen Thread is wrapped around the fold for a little country charm! 


The flower has technique, technique, technique! The small & large flowers are from the Daisy Lane Stamp Set & Punches. First I stamped the flower with Daffodil Delight, then took a dauber & dabbed it in Cajun Craze and stamped around the outside edges of the flower before stamping it on Very Vanilla Cardstock. For the smaller flower I repeated this process, but instead of Cajun Craze, I stamped the edges with Pumpkin Pie. Then I colored a lot of rhinestones with the Bronze Stampin Blend Marker for the flower centers. The whole flower is covered in Wink of Stella & in person this card is beautiful! 


Stampin' Up! products used:
  • Birch Background Stamp
  • Daisy Lane Stamp Set & Punches
  • Country Home Stamp Set
  • Stitched Be Mine Dies
  • Tin Tile 3D Embossing Folder
  • Gold Glimmer Paper
  • Linen Thread
  • Rhinestones 
  • Bronze Stampin Blend Marker
  • Wink of Stella
  • Very Vanilla
  • Blackberry Bliss
  • Crumb Cake
  • Early Espresso
  • Daffodil Delight
  • Cajun Craze
  • Pumpkin Pie
Shop Stampin' Up! products here!


Birch Background meets Details Deer Dies #2

For the North Carolina Stampin Up Demos meeting, I signed up for some display boards. This card was created for the board that used the Birch Background Stamp. I was to make 6 cards and focus on the Fall and winter holidays. My friend Tracy agred to make 3 of the 6 cards needed. Here is the first one I made.

~Enjoy!


This was a "template" I have made several times before & comes out nice every time I make it. This one uses the Birch Background Stamp in Smokey Slate, Real Red embossed with Swirls & Curls Embossing Folder and the Detailed Deer Dies cut from Silver Glimmer Paper. The sentiment is stamped with Itty Bitty Christmas. I colored the rhinestones with a Real Red Blends Marker and the whole thing is topped off with a bow made with White Polka Dot Tulle, White Bakers Twine and Silver thread. The envelope is decorated with a stamp from the Dashing Deer Stamp Set. This one is beautiful, but I decided to go with an alternate version that had a little more technique, make sure to see the final version here


Stampin' Up! products used:
  • Birch Background Stamp
  • Itty Bitty Christmas Stamp Set
  • Dashing Deer Stamp Set
  • Detailed Deer Dies
  • Swirls & Curls Embossing Folder
  • Silver Glimmer Paper
  • Real Red Blends Marker
  • White Polka Dot Tulle
  • White Bakers Twine
  • Silver Thread
  • Smokey Slate
  • Real Red
  • Whisper White
  • Basic Black
Shop Stampin' Up! products here!


Birch Background meets Nature's Beauty

While I was waiting for Tracy's last few cards to come in I decided to make a mini collection for the Birch Background for myself, so I grabbed the Nature's Beauty stamp set & got to work.

~Enjoy!


I really like the Nature's Beauty stamp set even though I am not the best colorist, so I just decided to stamp this guy on Crumb Cake and Early Espresso & let the stamp do all of the work. I used some retired Copper Glimmer paper to add a little bling as well as the new Ice Stampin Glitter and the Snowflake Sequins for the snowy effect. 


Stampin' Up! products used:
  • Nature's Beauty Stamp Set
  • Birch Background Stamp
  • Itty Bitty Christmas Stamp Set
  • In the Woods Die Set
  • 1/4 " Copper Trim
  • White Polka Dot Tulle Ribbon
  • Crumb Cake
  • Soft Suede
  • Early Espresso
  • Stampin Ice Glitter Snowflake Sequins
  • Rhinestones
  • Bronze Stampin Blend Marker
Shop Stampin' Up! products here!


Monday, September 16, 2019

Bone Appetit Paper Pumpkin Alternatives Banners

There were so many little leftover pieces from the August 2019 Paper Pumpkin Bone Appetit, so I decided to send some of my non-spooky Halloween friends a festive card instead (and I used up all of my little skeletons (boo-hoo).

~Enjoy!


Again, #pinspiration to the rescue! I love, love, love Lemon Lime Twist, it was such a  great color & since I bought a ream before it went away, I have lots to still play with! Here I embossed it with the Corrugated Embossing Folder for the background. The little banners are hand cut from this kit & also It's a Sara Thing Paper Pumpkin from April 2017. The sentiment is stamped with Gorgeous Grape and the Cauldron Bubble Stamp Set as well as the elements on the envelopes. I colored some Silver Metallic-Edge Ribbon with a Basic Black Blends Marker & tied that around a piece of Whisper White Polka Dot Tulle Ribbon. A little stip of Silver Glimmer Paper was added to the sentiment for a little more bling! Check out another version using the banner elements!


Stampin' Up! products used:
  • Bone Appetit Paper Pumpkin
  • It's a Sara Thing Paper Pumpkin
  • Cauldron Bubble Stamp Set
  • Corrugated Embossing Folder
  • Whisper White Polka Dot Tulle Ribbon
  • Silver Metallic-Edge Ribbon
  • Basic Black Blends Marker
  • Silver Glimmer Paper
  • Lemon Lime Twist
  • Memento Black
  • Pumpkin Pie
  • Gorgeous Grape
  • Basic Black
  • Whisper White
Shop Stampin' Up! products here!


Bone Appetit Paper Pumpkin Alternatives Seriously

This card is seriously cute!!! A little Halloween hello from this cute little pumpkin from the August 2019 Paper Pumpkin Bone Appetit kit.

~Enjoy!


I got a tiny bit of #pinspiration from this card which uses the April 2013 Seriously Paper Pumpkin kit which has 2 sentiments in it "Seriously" and "Love your guts", how appropriate for a skeleton, well maybe a zombie would have been better, but close enough! The Pumpkin Pie background is embossed with the Stylish Scrolls Embossing Folder & then lightly inked with a sponge and Memento Black ink. I added a strip of Basic Black that was embossed with the Wavy Lines Embossing Folder. Then I stamped the sentiment from the Seriously paper Pumpkin in Smokey Slate and lightly inked the edges with a sponge and Memento Black. The sentiment is also stamped with Memento Black. Topping it off is a knot made with Black Glittered Organdy Ribbon.


Stampin' Up! products used:
  • Bone Appetit Paper Pumpkin
  • Seriously Paper Pumpkin
  • Stylish Scrolls Embossing Folder
  • Wavy Lines Embossing Folder
  • Black Glittered Organdy Ribbon
  • Memento Black
  • Pumpkin Pie
  • Basic Black
  • Whisper White
Shop Stampin' Up! products here!


Bone Appetit Paper Pumpkin Alternatives Skeletons

OMG - these skeletons! So stinkin' super cute!!!! The elements in the August 2019 Paper Pumpkin Bone Appetit were super cute! I need more skeletons!!!!

~Enjoy!


Here is a variation of the Hands card, but this time we have these funny little skeletons popping out as a surprise! For the background I raided my Manly Occasions Paper Pumpkin kit from May 2016 for this Pumpkin Pie corrugated background paper. Almost everything is popped up with Dimensionals. The sentiment is stamped with Memento Black. Topping it off is a bow made with the Silver Metallic-Edge Ribbon that I colored with a Pumpkin Pie Blends Marker.


Stampin' Up! products used:
  • Bone Appetit Paper Pumpkin
  • Manly Occasions Paper Pumpkin
  • Silver Metallic-Edge Ribbon
  • Pumpkin Pie Blends Marker
  • Dimensionals
  • Memento Black
  • Pumpkin Pie
  • Whisper White
Shop Stampin' Up! products here!


Bone Appetit Paper Pumpkin Alternatives Hands

The elements in the August 2019 Paper Pumpkin Bone Appetit were super cute! I wish the hands would have come in a right/left combination, so here is what I did to try to disguise them so they looked like a pair.

~Enjoy!


As I was cutting apart the little boxes to use as background paper or shapes, the flap where you tie the boxes closed kept reminding me of a package lid - or a box lid! So the receiver of this card is going to get a box of spooky hands!  For the background I inked up the Swirls & Curls Embossing Folder with Pumpkin Pie & ran Pumpkin Pie cardstock through the embossing machine, when that was done, I ran a second piece through with the leftover ink, this card represents the second pass of color. I like how it is softer & a little speckly. Almost everything is popped up with Dimensionals. The sentiment is stamped with Memento Black. Topping it off is a bow made with Black Glittered Organdy Ribbon. Make sure to see the skeleton version of this card!


Stampin' Up! products used:
  • Bone Appetit Paper Pumpkin
  • Swirls & Curls Embossing Folder
  • Black Glittered Organdy Ribbon
  • Dimensionals
  • Memento Black
  • Pumpkin Pie
  • Whisper White
Shop Stampin' Up! products here!


Bone Appetit Paper Pumpkin Alternatives Pumpkin

Those boxes from the August 2019 Paper Pumpkin Bone Appetit were really bright! Since I moved to North Carolina & now work from home I did not really have a use for the boxes, so instead, I focused on cards.

~Enjoy!


Here is the #pinspiration for this card. For the background I raided my stash of Paper Pumpkins and gathered the Pumpkin Pie corrugated background from the May 2016 Manly Occasions kit. I also found this paper in another kit, but cannot find that information at the moment. I added a strip of polka dot box & layered all these really cute elements on top. The sentiment is stamped with Memento Black. Topping it off is a knot made with Black Satin Ribbon.


Stampin' Up! products used:
  • Bone Appetit Paper Pumpkin
  • Manly Occasions Paper Pumpkin
  • Black Satin Ribbon
  • Memento Black
  • Whisper White
  • Gorgeous Grape
Shop Stampin' Up! products here!


Coloring the Sew You PP Graphic Backgrounds

I was looking for some additional ideas and background papers for the Bone Appetit Paper Pumpkin September 2019 kit. I came across some very bold black and white graphics papers from Sew You Paper Pumpkin from March 2015, so here is what I did with them!

~Enjoy!


I cut down the card folders to 1 3/4 inch by 3 1/2 inch strips & started sponging away. I used Pumpkin Pie, Gorgeous Grape and the retired Lemon Lime Twist.


This is what happens when you sponge the backgrounds on apiece of white cardstock to be used for a future background! Check out some of the samples I created with them!


Stampin' Up! products used:
  • Sew You Paper Pumpkin March 2015
  • Whisper White
  • Pumpkin Pie
  • Gorgeous Grape
Shop Stampin' Up! products here!


Stamping off with Bone Appetit Paper Pumpkin

I admit it, I use my old Stampin' Up! bills as scrap paper. I tend to stamp off or sponged off on my bills. Sometimes when I get done with my project I look at my bill & think how pretty the stamped off items created!

~Enjoy!


So today, when I was sponging some paper, I decided to grab a card base & use it as I was sponging away. The paper was a 1 3/4 inch by 3 1/2 inch square so it created some cool shapes as I sponged. This background is using Pumpkin Pie.


I stole the elements from another project I was working on to see how it looked on the background - it is going to be super cute! I colored the Silver Metallic Edge Ribbon with Basic Black Blends Marker and added White Polka Dot Tulle Ribbon. The sentiment is from Cauldron Bubble Stamp Set. The extra banner strips in this set are from A Sara Thing from April 2017 Paper Pumpkin. Check out another version using the banner elements!


I continued on with the Pumpkin Pie background and added Gorgeous Grape. I think I added too much Grape.


Taking the project above and adding some elements from another project. It could work, but not sure I would use this background, maybe a layer of vellum may soften it.


Here are the sponged papers from Sew You Paper Pumpkin from March 2015. Can't wait to see what they become!


Stampin' Up! products used:
  • Bone Appetit Paper Pumpkin September 2019
  • A Sara Thing Paper Pumpkin April 2017
  • Sew You Paper Pumpkin March 2015
  • Cauldron Bubble Stamp Set
  • Basic Black Blends Marker
  • Whisper White
  • Pumpkin Pie
  • Gorgeous Grape
  • Silver Glimmer Paper
  • Black Satin Ribbon Ribbon
  • White Polka Dot Tulle Ribbon
  • Silver Metallic Edge Ribbon
Shop Stampin' Up! products here!


Bone Appetit Paper Pumpkin Boxes meets Sharpie

Here are some more ideas for using the boxes as background papers & toning down the very bright & shiny orange metallic "background papers" from the Bone Appetit Paper Pumpkin September 2019 kit.

~Enjoy!


I grabbed a Sharpie and drew lines through the dots and diagonals paper. I love the way they turned out, the bottom right one kind of looks like creepy eyes! Stay tuned to see how they get used!


Stampin' Up! products used:
  • Bone Appetit Paper Pumpkin September 2019
Shop Stampin' Up! products here!


Bone Appetit Boxes as Backgrounds

I was looking for some additional ways to use the "background papers" for the Bone Appetit Paper Pumpkin September 2019 kit.

~Enjoy!


I decided since they had a white core to emboss them & scruff them up with a sanding block to soften the very bright & shiny orange metallic. From Left, I used the Subtle Embossing Folder, Stylish Scroll Embossing Folder and the Scripty 3D Embossing Folder. For the bottom 2 under the skeleton, I scruffed them up with the point of my scissors. They turned out super cute & cannot wait to see what gets created with them!


Stampin' Up! products used:
  • Bone Appetit Paper Pumpkin September 2019
  • Subtle Embossing Folder
  • Stylish Scroll Embossing Folder
  • Scripty 3D Embossing Folder
Shop Stampin' Up! products here!


Bone Appetit Paper Pumpkin Alternatives Grape

The August 2019 Paper Pumpkin Bone Appetit was filled with little boxes with black and orange dots and stripes, here is how I avoided them, lol...

~Enjoy!


I did have a little #pinspiration for this card. For the background I embossed Gorgeous Grape with the Tufted 3D Embossing Folder and accented the tufts with rhinestones colored with the Basic Black Blends Marker. I added a strip of Basic Black paper & layered all the goodies from the kit on top. For the sentiment I did cut the sentiment away from the frame so I could color the frame with Gorgeous Grape and the sentiment with Memento Black. Topping it off is a knot made with Black Glittered Organdy Ribbon.


For this one I inked up an embossing folder with Gorgeous Grape & ran it through my embossing machine to give the texture even more definition. 


Stampin' Up! products used:
  • Bone Appetit Paper Pumpkin
  • Tufted 3D Embossing Folder 
  • Black Glittered Organdy Ribbon
  • Basic Black Blends Marker
  • Rhinestones
  • Memento Black
  • Basic Black
  • Gorgeous Grape
  • Whisper White
Shop Stampin' Up! products here!


Monday, September 9, 2019

#simplestamping with Beauty Abounds Color Challenge Fall

For the next project Tracy & had chosen the color combo of Crushed Curry, Cajun Craze and Pumpkin Pie for a fall theme using the Beauty Abounds Stamp Set.

~Enjoy!


We did have a small spark of inspiration from a Pinterest pin, but, I really just went where the stamp set sent me. I was not overly excited about how my large circles were stamping with such a distinct outline and no center, but if you do not expect the stamp to stamp as pictured on the box, it gives it a really cool effect. I used the stamp from this month's Paper Pumpkin The Gift of Fall.


For this second one I just decided to keep it simple, using the same products as above and just a clean stripe across the card. I really like how this came out and would be great for a #simplestamping class.


The this card, I had to go for & really dress it up. This takes the original card, turns it sideways and add lots of layers! I stamped the flourish in Crushed Curry on Crushed Curry for the yellow stripe and backed it with Gold Glimmer paper. The leaves are cut from the retired Bird Builder Punch. The tag is cut from the retired Decorative Label Punch and the whole thing is topped off with the Whisper White Polka Dot Tulle Ribbon and a multi loop bow made with the Linen Thread. This works much better as a background over a focal #simplestamping project.


The last card, I used the same products as above & trimmed down the second #simplestamping card to a focal point. I stamped the flourish in Cajun Craze on Cajun Craze for the banner & gave it a fishtail cut. The stripe underneath is stamped with the 3 colors and the Birch Background Stamp. The splats are stamped in Pumpkin Pie on Pumpkin Pie and the whole thing is topped with Whisper White Polka Dot Tulle Ribbon and Whisper White Baker's Twine. Make sure you go see what Tracy did with her cards!!! 


Stampin' Up! products used:
  • Beauty Abounds Stamp Set
  • August 2019 Paper Pumpkin Kit, The Gift of Fall
  • Birch Background Stamp
  • Bird Builder Punch
  • Decorative Label Punch
  • Whisper White Polka Dot Tulle Ribbon 
  • Whisper White Baker's Twine
  • Linen Thread
  • Gold Glimmer Paper
  • Whisper White
  • Crushed Curry
  • Cajun Craze
  • Pumpkin Pie 
Shop Stampin' Up! products here!